Adobe indesign
Frequently asked questions
adobe indesign
Professional Adobe InDesign desktop publishing for multilingual projects. Layout adaptation, typesetting, and print-ready output in any language.
Adobe InDesign CS 2: a new generation?
With InDesign Adobe has introduced a new generation of DTP tools to the market and, probably, sounded the warning for PageMaker to move over. Many users look concerned at the future and at the possible end of FrameMaker. Meanwhile, version 4 of InDesign - better known by the name "CS2" - is offering a few functionalities that promise more flexibility for Technical Documentation than the classic FrameMaker.
As against Adobe FrameMaker, Adobe InDesign CS 2 includes a wide range of creative functions. Therefore, if nothing else, "CS" may also stand for "Creative Suite". Of these functionalities, however, only some are useful for creating User and Operating Manuals, but on the whole the DTP program's features are much easier to handle than those of FrameMaker.
Instead of elaborately setting up a scheme for the document at the outset, the InDesign user can start off directly. Of course, the user should be aware that every step must be well thought of. Unorganized working style and using external documentation components will be chastised at the time of updating the print version.
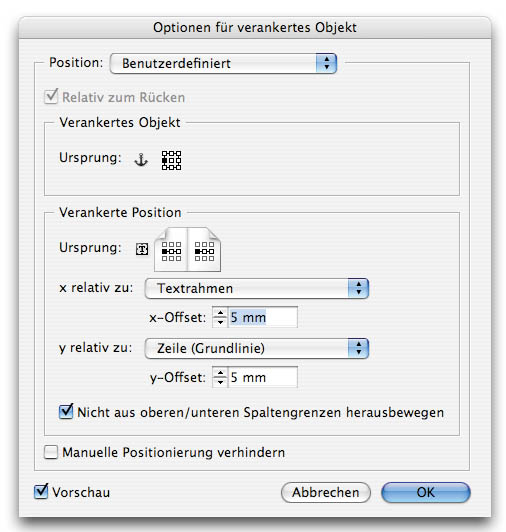
Fig 1. Anchored objects can be text and graphics. They always refer to an anchor in running text and can also be aligned numerically.
Support for external third-party formats
Whenever different individuals are working on a Technical Documentation or, when portions of the documentation are also to be used in other print versions, often Microsoft Office applications such as Word and Excel are deployed as content or data suppliers. Unlike FrameMaker, InDesign does not see such an external component as a standalone object for which a "logbook" is maintained on the usage and updated status. Instead, in InDesign imported texts are on equal footing with its own edited texts.
Anchored objects
A function that was till now reserved only for the users of Word and FrameMaker, is now an integral part of CS2 as anchored objects. In the case of long and multi-column or even multi-page text blocks, it is possible to assign a point of reference to flowing graphics or additional text blocks by setting an anchor. Intelligent settings enable us even to ensure offsetting to double pages. In detail, for example, this relates to reflecting the flowing objects that are on the left and right edge.
Tables
From the version CS onwards, it is possible to handle tables in InDesign while using external Microsoft Excel tables. A new feature in the version CS2 is the separate setting for headers and footers in the table that are automatically repeated in multi-column or multi-page tables. Similarly, columns and rows can be designed in varying shapes. As regards handling of XML, InDesign facilitates using of tables as a whole XML object including its table rows as tagged XML information.
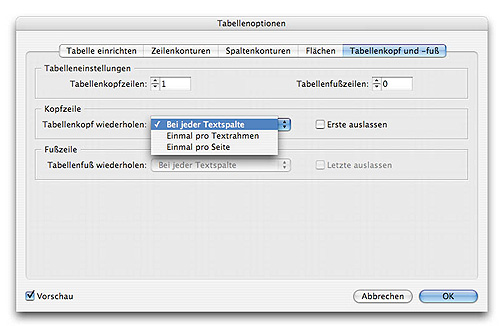
Fig 2. With the extended settings table headers and footers can are automatically repeated in the subsequent columns and/or pages.
InDesign Snippets
Instead of delivering recurring design components centrally over the Adobe InDesign Library to documents, as is the case till now, Snippets offer an XML based alternative for temporarily saving not only contents, but also design and geometry to a file. In this, the user need not necessarily save an entire InDesign page just the selected objects are sufficient as a Snippet. By using appropriate tools Snippets can be edited and, if necessary, embedded in new documents.
Object styles
Object styles are probably the most powerful tool of InDesign. If, till now, each object setting such as edge style, background, transparency, heavy shadow or text formatting had to be defined separately for each object, now - just as in the layout of paragraph formats - any number of object styles can be created. In actual practice, a mere click of a button displays a style and selected objects with the previously saved properties.

Fig 3. For recurring layouts of content and shapes especially, object styles simplify the work significantly.
Adobe Bridge
The Adobe Bridge function is also known as the new Adobe Command Centre. Using its Help menu, the user can save and organize images, text, external files and Snippets easily by employing the Drag and Drop method. At the first glance itself, it is apparent that Adobe Bridge is closely tending towards the functions of an image database, like Media Asset Management. Captioning set objects and files follows the XMP standard. A major advantage is that, this method operates from InDesign to Bridge as well as in the reverse direction. Also other external files can be added and utilized in the same manner. Once organized, the user can find the objects by means of an integrated Search function and preserve the Search results as a collection for later projects.
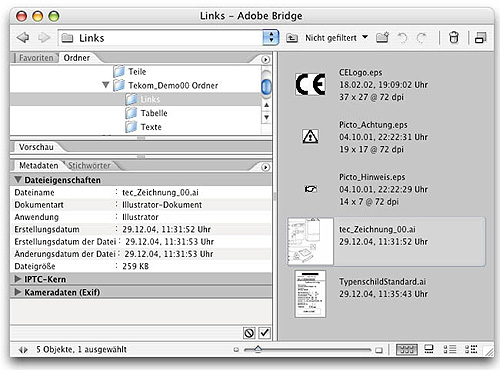
Fig 4. Depending on the object, for example, also important information about colours and fonts used can be managed.
XMP is based on XML and stands for "Extensible Metadata Platform". In this, information regarding resolution, colour range, copyright and keywords is managed primarily focusing on digitally created images. In combination with the Adobe Creative Suite 2 even other objects, which are not image-related objects in the original, can be used, managed and assigned a version. By employing the XMP Software Development Kit, the user can customise the creation, processing and exchange of meta data.
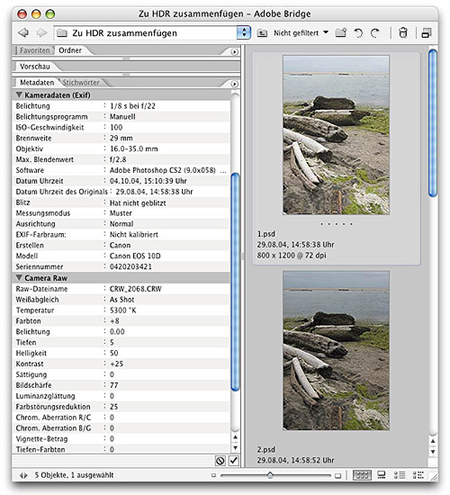
Fig 5. XMP details tell us what the optical conditions and settings were when an image has been made.
Hyperlinks and Bookmarks
Some of the main functions of Adobe FrameMaker are placing hyperlinks and bookmarks. InDesign CS 2 too supports both these functions. Combined with the facility to create in a structured document levels, for example, for different languages and to semi-automatically assign hyperlinks and bookmarks, the capabilities of InDesign become obvious at the time of exporting directly to PDF. The PDF created thus displays the different variants of languages in a document through fading in levels. Language-sensitive information is quickly accessed by means of the hyperlinks and bookmarks created earlier with InDesign.
Nested formats
Adobe InDesign encourages creativity while implementing design layout tasks. For example, using a nested format for the text content, that is to say, a string of characters, a change in the format can be controlled. In actual practice, this means a numeric string of 0203 in the middle of a running text is automatically turned into bold or the text is indented from this point. Using the nested formats a range of texts can be structured and controlled even for Technical Documentation.
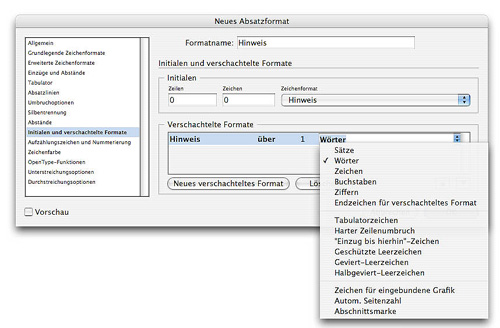
Fig 6. Nested formats simplify the task of working with recurring highlighted portions of text.
Version Cue
Unorganized intermittent saving of files for documenting different versions is rather the problem of "classically creative", for example, in the case of a presentation. On Monday, the file is named "Presentation_Draft", one day later consequent to a few modifications the file is called "Presentation_Tue". Shortly before the actual presentation, normally three to four versions later, we hear about a "Presentation-Final". But then, some more modifications are implemented after the presentation - the chaos through more or less randomly chosen file names and the search for their location on the disk.
Version Cue puts an end to this approach. Every file can be saved as a version along with a short description and automatically to a centralised location. If Tuesday's version is used as the basis for subsequent refinements, the user can convert them into the current version just by a click of a button. If several individuals are working on a project, the application can be used as an organizer and control a file over the Internet access. Likewise, collaborative procedures such as comments on Adobe PDF can also be utilised.
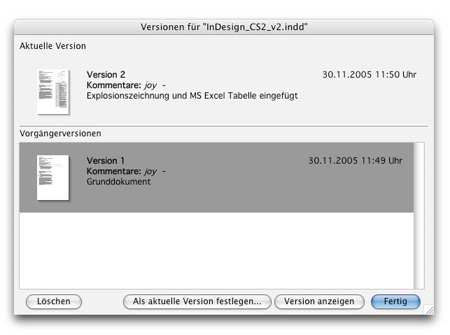
Fig 7. Adobe Version Cue shows all versions of a document - if an error has crept in or an older version needs to be used, it can be decided by using this application.
All things considered
Adobe has invested a lot of effort in integrating its own range of products. Adobe InDesign CS 2 signifies a major milestone in the history of total solution package for the DTP work - a new generation that is remarkably suitable also for creating Operating Manuals.
What are the top 10 new features in Adobe InDesign CS2?
The top 10 new features in Adobe InDesign CS2 are:
- Adobe Bridge
Browse, organize, label, and preview graphics, as well as InDesign documents, templates, and snippets. Drag and drop assets from Adobe Bridge into layouts more easily and efficiently. Search for files using metadata, such as keywords, colors, and fonts used. - Object styles
Apply and globally update object-level formatting more efficiently using object styles. Save a wide range of graphic, text, and frame-level attributes as object styles to create more consistent designs and speed up production tasks. - Control visibility of layers in Adobe Photoshop and PDF files
Selectively display layers and layer comps in Photoshop files, and layers in Adobe PDF files, to experiment with different design options or use multiple variations of a file in your layout-all while linking to a single file. - InDesign snippets
Easily export InDesign objects as snippets, which can be shared with colleagues or reused in other documents. When you place or drag a snippet into a layout, InDesign recreates the original objects, their formatting, and their relative positioning on the page. - Tighter integration with Adobe InCopy CS2
Collaborate more closely with editors through the new Adobe InCopy CS2 LiveEdit workflow, which enables designers and editors to work in parallel on an InDesign layout without overwriting each other's changes. With the new assignments workflow, you can break up access to documents among multiple editors by assigning only those elements that different editors need to work on-whether that's specific frames on a page, on one or more spreads, or across a document. - Ability to open InDesign CS2 files in InDesign CS
Export your InDesign CS2 document to the InDesign Interchange format (INX) to share with people still working in InDesign CS. - Anchored objects
Easily anchor callouts, pull quotes, margin notes, and graphics to text. Precisely control the positioning of anchored objects, apply text wrap settings, and more. - Significantly enhanced Microsoft Word/RTF import filter
Automatically style Microsoft Word files on import by mapping Word styles to InDesign styles. Also resolve style name conflicts at import, preserve local overrides while removing other formatting, and save Word import settings as presets for future use. - Smart text handling
Drag and drop text within and between text frames, tables, views, and documents. Automatically strip the original formatting from copy as you paste it, so that the pasted text will inherit the formatting applied at its new location. Preview fonts in WYSIWYG font menus. - Enhanced XML support
Import XML files using enhanced import options, which give you flexible control and make it easier to achieve the results you want. Create a link to an XML file on import for easier updating. Apply XML tags to InDesign tables, and then import XML content into or export it from those tables.
Unable to save InDesign CS2 files in InDesign CS format?
The Save As Type menu (Windows) or the Format menu (Mac OS) in the Save As dialog box doesn't list InDesign CS as an option.
You can export a file in INX format from InDesign CS if you installed the Adobe InDesign CS 3.0.1 April 2005 (CS2 Compatibility) Update.
To export to the InDesign Interchange (INX) format, choose File > Export, select InDesign Interchange from the Save As Type menu (Windows) or the Format menu (Mac OS), and click Save.
To locate and open an INX file InDesign CS, choose File > Open.
Adobe InDesign CS2 supports backwards compatibility with InDesign CS by using the Export command, not the Save As command. You export a document to the InDesign Interchange Format, rather then saving the document to InDesign CS format, anytime you want to open an InDesign CS2 document in InDesign CS. Please note that InDesign CS must have the Adobe InDesign CS 3.0.1 April 2005 (CS2 Compatibility) Update patch installed to open these INX files. Also, InDesign CS does not support new InDesign CS2 features, so some changes may occur when you open these INX files in InDesign CS.
InDesign CS crashes when you try to open an INX file from InDesign CS2?
InDesign CS requires the InDesign CS 3.0.1 April 2005 (CS2 Compatibility Update) to open INX files created in InDesign CS2.
InDesign CS may crash if you open an INX file and the correct update isn't installed, or if the InDesign CS2 document that created the INX file contains missing links or problematic third party plug-in data.
InDesign CS may crash when links are broken and Color Management is enabled. If the links are active (that is, not broken) you should be able open INX files in InDesign CS with Color Management enabled.
Solutions
Do one or more of the following solutions:
- Install the InDesign CS 3.0.1 April 2005 (CS2 Compatibility Update).
You can download the update from the Adobe website, or choose Help > Updates and select the update from the dialog box.If you've installed the April 2005 update, re-create the InDesign CS preferences.
To re-create the InDesign CS preferences file:- Quit InDesign.
- Rename the InDesign SavedData file and the InDesign Defaults file (for example, to InDesign SavedData.old, InDesign Defaults.old) in the following location:
Windows: Documents and Settings/[user name]/Application Data/Adobe InDesign/ Version 3.0
Mac OS: [user name]/Library/Preferences/Adobe InDesign/Version 3.0 - Start InDesign. InDesign creates new preference files.
- If the problem persists, you can restore the original preferences by deleting the new files and renaming the old preference files back to their original names.
- Disable Color Management before you open the file.
- Start InDesign and do not open any documents.
- Choose Edit > Color Settings.
- Deselect Enable Color Management, and then click OK.
- Open the INX file.
- Fix any broken links in the original InDesign CS2 document, and then re-export it to INX format.
Use the Preflight utility in InDesign CS2 to check for and fix broken links in the document before you export it to INX format.- Open the document in InDesign CS2.
- Choose File > Preflight.
- If the Preflight dialog box reports problems with links, select Links And Images on the left, and then click Repair All.
- Close the Preflight dialog box.
- Re-export the document: Choose File > Export, choose InDesign Interchange from the Save As Type menu (Windows) or the Format menu (Mac OS), name the file, and then click Save.
- Create a package folder in InDesign CS2, export an INX file into the package folder, and then open the INX file from that folder.
- Open the document in InDesign CS2.
- Choose File > Package
- Save the publication, specify the location and file name to save the package, then click Save.
- Re-export the document into the package folder you created in the previous steps: Choose File > Export, choose InDesign Interchange from the Save As Type menu (Windows) or the Format menu (Mac OS), name the file, and then click Save.
- If necessary, move the whole package folder to the desired location and open the INX file from within the package folder.
Important: If you need to move the files, you must move the whole package folder, not just the INX files, to prevent broken links.
- Re-create the document in InDesign CS2.
Copy and paste the objects from the original InDesign CS2 document to a new document, and then export it to INX format.- Open the original document in InDesign CS2.
- Create a new document that has the same number of pages, margin guides, and columns as the original document.
- In the original document, choose File > Select All, and then choose File > Copy.
- In the new document, choose File > Paste on the corresponding page.
- Repeat steps 3-4 to copy the objects from each page to the new document.
- Choose File > Export, choose InDesign Interchange from the Save As Type menu (Windows) or the Format menu (Mac OS), name the file, and then click Save.
- Remove and re-apply masterpage overrides.
Locate any items or text frames to which you applied Override A Masterpage Object or Remove Selected Local Overrides, or choose Remove All Local Overrides from the Layers palette menu.
Select the item again with Ctrl+Shift (Windows) or Command+Shift (Mac OS) to override the masterpage object again, or choose Override All Master Page Items to override all master page items in a targeted spread.
Transparency issues?
Here are quick answers to common problems:
If your type that appears over a transparency effect seems to be getting fat at output, try moving the type to a new layer above the transparency effect.
If your printer or output device does not support layered PDF files, consider outputting to the PDF/X-1a profile, a flattened format.
Are you seeing off-color frames, white boxes or white outlines around your masked bitmap photos? There are many causes for this. You may not be printing to the right version postscript device. You may be using art with conflicting color profiles or color modes. You may be inappropriately trying to mix spot colors with process colors. You may have ignored the settings in the transparency flattener control dialog.
Why do my images appear in low resolution?
ONSCREEN
If your image appears in low resolution onscreen, right click (CTRL-click on Mac) on the image and go to Display Performance>High Quality Display. This will present the image in high resolution. To show all images in high resolution, go to the View menu and choose High Quality Display.
IN PRINT
If your image appears in low resolution in print, check your print settings! In the print dialog, make sure you are printing with Graphics: Images: Send Data: ALL Do not choose optimized subsampling.
Why does InDesign default to display low resolution images? - - SPEED - - Enabling high resolution slows your computer.
What is Adobe Creative Suite 2?
Adobe Creative Suite 2 is the next generation upgrade to Adobe's creative professional software. It's a unified design environment that combines full new versions of Adobe Photoshop CS2, Illustrator CS2, InDesign CS2, GoLive CS2, and Acrobat 7.0 Professional software with enhanced Version Cue CS2 file manager, new Adobe Bridge visual file browser, and new Adobe Stock Photos. New features also include the ability to manage color settings centrally and common Adobe PDF settings. Delivering the next level of integration in creative software, Adobe Creative Suite 2 enables you to realize your ideas anywhere-in print, on the Web, or on mobile devices.
NOTE: Adobe Creative Suite 2 is available in two versions: Premium Edition and Standard Edition. Adobe Creative Suite Premium Edition is described above. The Standard Edition combines all of the components listed above, except GoLive CS2 and Acrobat 7.0 Professional.
Is there any difference between the standalone version of InDesign CS2 and what's included in Adobe Creative Suite 2 Premium or Standard Edition?
No, there is no difference in features, functionality, or included content between InDesign CS2 as a standalone product and InDesign CS2 in Adobe Creative Suite 2, except for Adobe Bridge. In the suite, Adobe Bridge gives you access to suite-only features that aren't available in the standalone products, including Version Cue CS2, Bridge Center for easier access to projects and information, and the ability to synchronize color settings across the components of the suite.
What are Adobe Bridge and Adobe Stock Photos?
Adobe Bridge
Adobe Bridge, which is included with the standalone version of InDesign CS2 and as a component of Adobe Creative Suite 2, is a visual file browser and a hub for productivity in both InDesign and the suite. You can run it independently or access it from within InDesign CS2, Illustrator CS2, Photoshop CS2, and GoLive CS2. Adobe Bridge allows you to efficiently organize, browse, and locate the assets they need to create content for print, Web, and mobile. Adobe Bridge is also the primary interface for Version Cue CS2 file manager and includes access to the new Adobe Stock Photos service. (It is not available for purchase as a standalone product itself.)
Adobe Stock Photos
Adobe Stock Photos, accessible from within Adobe Bridge, is an exciting new service that can help you get your creative ideas flowing. Offering one-stop shopping for high-quality, royalty-free stock images for your creative work, Adobe Stock Photos is a convenient way for you to view, try, buy, and manage stock photos from some of the world's leading image libraries-or simply to get inspired.
Adobe InDesign PageMaker Edition and Adobe PageMaker Plug in Pack?
Acobe has incorporated all of the functionality first introduced in Adobe InDesign CS PageMaker Edition and the PageMaker Plug-in pack into InDesign CS2, so these separate products are no longer necessary. Both the InDesign CS PageMaker Edition and the PageMaker Plug-in Pack were originally created to help PageMaker users more easily make the switch to InDesign (users could either license the PageMaker Edition, or, if they'd already licensed InDesign CS, they could add on the PageMaker Plug-in Pack to make it match PageMaker Edition). Now InDesign CS2 includes these features as part of its core functionality, just for PageMaker users:
- Publication converter for PageMaker 6.0 files
Convert PageMaker 6.0 document and templates to InDesign CS2 format, and in some cases even fix damaged PageMaker files or open previously unopenable PageMaker files (with limitations). This capability expands the conversion support that has been available in InDesign since version 1.0: the ability to open PageMaker 6.5-7.x and QuarkXPress 3.3-4.x documents. - InBooklet Special Edition (SE) plug-in
Automatically rearrange a document's pages into printer spreads for professional printing with complete control over margins, gaps, bleeds, creep, and crossover traps-a process known as imposition. Choose among 2-up saddle stitch, 2-up perfect bound, and 2, 3-, and 4-up consecutive. - Automated bullets and numbering
Automatically create and style bulleted and numbered lists or save them as part of paragraph styles. Numbered lists update automatically when changes are made. - Data merge
Create customized publications, such as catalogs, direct mail campaigns, business cards, form letters, and mailing labels by merging data from a spreadsheet or database into your InDesign layouts. - Position tool
Resize and move images and their frames or reposition content in relation to frames using the handy Position tool, which works similarly to the Crop tool in PageMaker. - PageMaker compatible keyboard shortcuts
Work at peak efficiency by switching the keyboard shortcuts in InDesign CS2 to match the shortcuts you've already learned for PageMaker. - PageMaker toolbar
Enjoy easy access to commonly used commands through a Windows-style toolbar similar to ones used in Acrobat and Microsoft Word. Available for both Mac OS and Windows users.
In addition, InDesign also incorporates enhanced versions of other "must-have" features for PageMaker users, such as the Story Editor and Control palette.
How does InDesign CS2 work with other Adobe products?
Adobe InDesign CS2 is designed to integrate tightly with Adobe Photoshop CS2, Illustrator CS2, GoLive CS2, InCopy CS2, and Acrobat 7.0 Professional. InDesign CS2 shares common commands, palettes, tools, and keyboard shortcuts with Photoshop CS2, Illustrator CS2, and InCopy CS2-so it's easy to apply what you know about one program to learning another and to move from program to program efficiently. It simplifies the workflow involved in laying out and updating graphics by importing native Photoshop and Illustrator files. And it imports and exports Acrobat 7.0, 6.0, 5.0, and 4.0 PDF files. InDesign CS2 and InCopy CS2 work together to provide robust editorial workflow management for small creative teams. The enhanced Package for GoLive command offers a compelling new, visually oriented workflow for designers who want to repurpose InDesign assets as Web pages in GoLive.
Read moreWhat is Adobe InCopy?
What is Adobe InCopy and how is it relevant to InDesign users?
Adobe InCopy CS2 software is a professional writing and editing program that integrates tightly with Adobe InDesign CS2 to deliver a complete solution for collaborative editorial workflow. It is designed to scale to the needs of small, medium, and large content publishers. A version of InCopy is available directly from Adobe for small workgroups. Medium-to-large publishers can acquire powerful editorial solutions based on InCopy CS2 and InDesign CS2 from third-party developers and systems integrators.
InCopy CS2 for small workgroups includes editorial workflow technology that enables designers and editors to work on the same InDesign CS2 document simultaneously without interfering with each other's work. InCopy CS2 gives editors 100% accurate information about line breaks and up-to-the-minute visual feedback about page design, so editors can copyfit text with complete insight into how the copy and design interact. This support for parallel workflows reduces the number of review and revision cycles, and ultimately streamlines the time it takes to get publications to market. It also puts copy-fitting control back in the hands of editors who have more control over the integrity of their editorial content.
How does InCopy CS2 differ from the Story Editor in InDesign CS2?
InCopy CS2 is a full editorial solution that's designed to support more efficient workgroup publishing by giving designers and editors simultaneous access to the same InDesign layouts without fear of overwriting each other's work. In addition, InCopy provides powerful customizable editorial tools and cross-media publishing support. In contrast, the Story Editor in InDesign provides excellent word-processing and copyfitting support for a single user working on an InDesign layout.
Why is InCopy CS2 only offered separately from Adobe Creative Suite 2?
Professional editors are the primary users of InCopy CS2 and generally don't require the full functionality of Adobe Creative Suite 2, while the designers they work with do. As a result, it makes sense to offer InCopy and the suite separately. Designers can make full use of Adobe Creative Suite 2, while the editors they work with can easily integrate standalone InCopy CS2 with InDesign CS2 in a collaborative editorial workflow.
How do I open a QuarkXPress document with Adobe InDesign?
- InDesign only opens Quark 3 and 4 single language documents. InDesign CS2 can open QuarkXPress Passport 3 or 4 files.
- QuarkXPress Passport documents must be saved to a single-language file unless you are using InDesign CS2.
- InDesign cannot open QuarkXPress 5 or newer documents. QuarkXPress 7 can export down to version 6. QuarkXPress 6 can save down to version 5. QuarkXPress 5 can save down to version 4.
- InDesign may have trouble opening QuarkXPress documents where third party XTs were used. Try saving your document from QuarkXPress without these XTs enabled.
- After conversion, some graphics may be set as 'non-printing'. You can correct this easily with a free script from here.
- InDesign CS has improved ability over InDesign 2 to open Quark documents.
If you are still having trouble opening a QuarkXPress 3 or 4 document, try resaving the document in Quark as a new file. Then open in InDesign.
No conversion is prefect. Be certain to fully review your document for text reflow and bad image links.
Is it possible to convert QuarkXPress documents to InDesign CS2 format?
Quark has chosen to encrypt the XPress 5.0 and 6.0 file formats. Because of this decision, InDesign CS2 cannot directly open and convert XPress 5.0 and 6.0 files. By contrast, the InDesign file format is not encrypted, so it better supports and adapts to a wide variety of workflows.
- Mac OS users: There is one solution for converting your XPress 5.0-6.5 documents to InDesign. A third-party plug-in developer, MarkzWare, produces MarkzTools 5.5, a plug-in to QuarkXPress 4.x and 5.x for the Mac that can open your XPress 6.x files and save them back to XPress 4.x format. You can then open those files in Adobe InDesign CS, which is able to convert files from XPress 3.3-4.x. Please note that new XPress 6.0 features may not be supported when you save backwards to QuarkXPress 4.x format.
- Windows users: Unfortunately, there are no solutions available at this time for Windows users of XPress 5.0 or 6.0 to move their files to InDesign. Should any options become available in the future, we will provide information about those solutions.
InDesign through Trados StoryCollector?
Trados offers little plug-ins as part of all its versions of the Workbench product that support InDesign versions 2 or CS (the plug-ins are stored under C:\Program Files\TRADOS\Txx_xx\FI\IND- follow the instructions in the help file on how to install the plug-ins). Once you have installed the plug-in and opened the InDesign file, you will see a new Trados menu with all the necessary commands to export and re-import your file. The exported text can be translated either within Trados TagEditor or any other tools that support the InDesign export format. It works like a charm, and the import, once the translation is finished, works just as well. SDLX and Star Transit (with a separate plug-in) also offer the option of translating InDesign files, but again just for versions 2 and CS. SDL is working on the development of products that support CS2 files for Trados and SDLX, but these are still in the pre-beta phase. And the only way to down-save an InDesign CS2 file is by exporting it into an InDesign-specific XML format (INX) and importing this into the CS version.
The StoryCollector that comes with Trados FL 6.5.5 works like a charm with InDesign CS. It exports ISC-files, that needs to be converted to TTX in Trados TagEditor. The TTX import fine in DVX, and then you just need to reverse the process.
The plug-in files should be installed in a folder called Trados in the InDesign Plug-in folder. When you start InDesign a new menu option will appear on the menubar called Trados. This contains the options for importing and exporting.
All this information and how to proceed with the import/export routines can be found in the file StoryCollectorIND1033.hlp. Double click on the file and all your frustrations will be relieved.
Indesign CS2 is not compatible with Trados 6.5. Only version 2.0 of Indesign works with Trados 6.5. You will have to upgrade to Trados 7.0 for CS version of Indesign.
TRADOS Story Collector is an InDesign Plug-in. The Plug-in is supported by InDesign 2.0 and InDesign CS. It allows you to gather up all the stories in an InDesign document so that they can be presented, in context, within one file for translation. Note that InDesign CS2 is not currently supported by the Story Collector.