Structured Documents?
A structured document is a document that can be viewed in several ways: as an author, a publisher, or a viewer. SGML, XML, and HTML are examples of structured documents. XML is used in this tutorial to demonstrate the Structured FrameMaker feature.
Structured documents, such as XML files, are created using elements. When working with XML files, the element definitions and structural information is stored in a Document Type Definition (DTD). When working with structured document in FrameMaker, the element definitions and structural information is stored in an Element Definitions Document (EDD). The EDD also contains formatting and style information. When you create a structured document in FrameMaker, you must associate an EDD to the document.
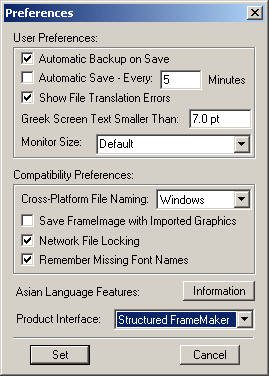
Changing the Product Interface
Before you begin working with structured documents, you must change the interface to Structured FrameMaker.
To change the interface:
- Open FrameMaker.
- Select File > Preferences > General
The Preferences dialog box appears.

- From the Product Interface pull-down menu, select Structured FrameMaker.
- Click Set.
- Close and restart FrameMaker.
Creating a Structured Document using a Standard Template
You cannot create a new structured document within FrameMaker without first creating an EDD. EDDs are usually created by an application developer and are outside the scope of this tutorial.
To create a structured document using a template:
- Select File > New > Document.
- Change to the Structured folder within the FrameMaker 7.0 directory.
- Select StrucBody.fm, and click New. The new document appears in the document window.
- Select File > Save to save your document.
Opening the Structure View
The Structure View provides a hierarchical representation of the document structure and shows the relationship of the elements that are currently used in the document.
To open the Structure View dialog box, click 
located on the right side of the document window.
The Structure View dialog box appears.
Opening the Element Catalog
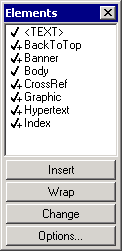
The Element Catalog provides a list of all elements that are available for use within the structured document.
To open the Element Catalog and display all elements:
- Click
 located on the right side of the document window.
The Elements dialog box appears.

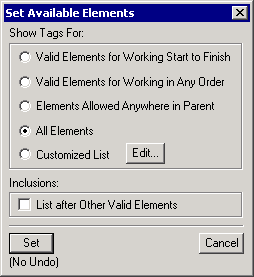
The Element Catalog contains the elements that are available for this document. Initially, the only elements that appear in the Element Catalog are the elements that can be inserted into the area in which the cursor is currently placed. - If you want to view all elements for the document, click Options located at the bottom of the Element Catalog.
The Set Available Elements dialog box appears.

Select All Elements, and then click Set.
All elements for the current document are displayed in the Element Catalog.
Displaying Element Boundaries as Tags
To display element tags:
- Place your cursor within the structured document.
- Select View > Element Boundaries (as Tags).The element tags appear in the document window.
- Place your cursor within various parts of the document.Notice that the list of valid elements within the Element Catalog change according to the location of your cursor. These elements are indicated by a check mark.
Inserting Elements and Attributes
When you place your cursor within the tags of a structured document, the list of valid elements change. These elements are displayed with a check mark within the Element Catalog. If you insert an element that is not valid, your document is no longer structured.
To insert elements:
- Place your cursor between Heading1 and FAQDoc.
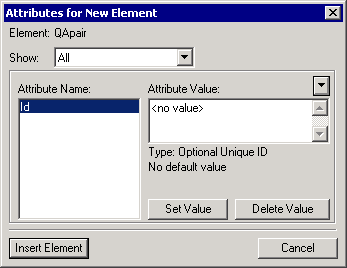
- From the Element Catalog, select QApair, and click Insert.
The Attributes for New Element dialog box appears.

- In the Attribute Value list, highlight < no value > , and type 04142004.
Tip: Although this attribute is optional (see Type: Optional Unique ID in previous dialog box), it is good pratice to use the attribute value within a structured document. You can use this value to identify the segment of text when searching large documents. - Click Insert Element.
New element tags appear in the document window, and your cursor is automatically placed within the tags. - Within the new element tags, type What is the answer?
- Place your cursor between Question and QApair.
- From the Element Catalog, select Answer, and click Insert.
New element tags appear in the document window, and your cursor is automatically placed within the tags. - Type The answer is 42.
Validating a Structured Document
To verify the structure of your document, you must validate it. Validating your document ensures that all constraints defined for your document have been met. A document is not structured if does not pass validation.
To validate a structured document:
- Select Element > Validate.
The Element Validation dialog box appears. - From the Scope area, select Entire Document.
- Click Start Validating.
Within the Element Validation dialog box, notice the error message that is returned.
Within the document window, the cursor is placed at the point where the error occurs, and within the Structure View, a red box and an arrow appear at the point where the error occurs.
To make this document valid, elements must be added before the Heading1 tag. - Within the document window, make sure your cursor is placed before the Heading1 tag.
- From the Element Catalog, double-click MenuBar.
- Double-click Menu, and then double-click CrossRef.
The Cross-Reference dialog box appears. - From the Element Tags list, select QApair.
- From the Element (in Document Order) list, select What is the answer?
- Click Insert.
- Validate the document again by following the previous steps.
You should receive the following message indicating that your document is valid.
Saving a Structured Document as an XML file
The best way to save a structured document as an XML file using FrameMaker is to export the file into WebWorks Publisher Standard Edition. This application is shipped with FrameMaker, but installed separately. You must have WebWorks Publisher installed to complete this procedure.
To save a structured document as an XML file using WebWorks Publisher Standard Edition:
- With your document open, select File > WebWorks Publisher Standard Edition.The Project Launcher dialog box appears.
- From the Create a New Project area, select XML +CSS Standard Edition from the Using an existing WebWorks Publisher Project or Template pull-down menu.
- Click OK.
The New Project Wizard dialog box appears. - In the Please choose a name for this project box, type a name for the project.
- Click Next.
- Click Browse, and locate the file to convert.
- Click Next.
Tip: You can change the default mappings by selecting a row and then selecting a value from the pull-down menu. For this procedure, the default settings are used. - Click Next, and then click Finish.
A project window appears. - Within the project window, click the plus sign (+) next to your FrameMaker document.
An XML file appears beneath your FrameMaker document. - Double-click the file to display it in a browser window.
Comments
 English


 Bulgarian

 located on the right side of the document window.


