Expert Adobe FrameMaker services for technical documentation. Multilingual DTP, structured authoring, and long-document publishing solutions.
XML smart, enterprise ready! Adobe FrameMaker is a desktop publishing and Help authoring application published by Adobe Systems. It is especially suited for creating long technical documents.
Read moreНе е необичайно да има „смесени“ работни процеси в FrameMaker, при които членовете на екипа използват различни версии на FrameMaker. Документи, запазени в по-ниска версия, могат да бъдат отваряни с по-високи версии, но не можете да отваряте документи, запазени с по-висока версия, с по-ниска версия на FrameMaker. Има две решения: Първо, можете да използвате по-високата версия, за да „запишете надолу“ към по-ниската версия. Въпреки това, можете да запишете надолу само към следващата по-ниска версия, например от FrameMaker 12 към FrameMaker 11. Второ, можете да запишете документа в MIF (Maker Interchange Format), в който случай можете да го отворите с всяка по-ниска версия на FrameMaker.
Основната пречка при записването в MIF е, че трябва да не забравяте да го направите. Но с ExtendScript можете да автоматизирате това. Можете да създадете скрипт, който автоматично ще записва документа в MIF всеки път, когато изберете File > Save или натиснете Control+S. Когато сте готови да предадете MIF файла на друг член на екипа, който може да използва по-ниска версия на FrameMaker, знаете, че той винаги ще отразява последно записаните промени.
Ето как да настроите скрипта по-долу:
Notification (Constants.FA_Note_PostSaveDoc, true);


function Notify (note, object, sparam, iparam) {


    switch (note) {

        case Constants.FA_Note_PostSaveDoc :

        saveAsMif (object);

        break;

    }

}


function saveAsMif (doc) {


	// Get required parameters for the save function.

    var params = GetSaveDefaultParams();

    var returnParamsp = new PropVals();


    // Replace the .fm extension with .mif.

    var saveName = doc.Name.replace (/\.[^\.\\]+$/,".mif");


    // Get the FileType save parameter and set it to MIF.

    var i = GetPropIndex(params, Constants.FS_FileType);

    params[i].propVal.ival = Constants.FV_SaveFmtInterchange;


    // Save the document as MIF.

    doc.Save(saveName, params, returnParamsp);

}
XML ориентиран, готов за предприятия! Adobe FrameMaker е приложение за настолно издателство и създаване на помощни системи, публикувано от Adobe Systems. То е особено подходящо за създаване на дълги технически документи.
Read moreIt is not unusual to have “mixed” FrameMaker workflows where members of a team are using different versions of FrameMaker. Documents saved in a lower version can be opened with higher versions, but you can’t open documents saved with a higher version with a lower version of FrameMaker. There are two solutions: First, you can use the higher version to “save down” to the lower version. However, you can only save down to the next lowest version, for example, from FrameMaker 12 to FrameMaker 11. Second, you can save the document to MIF (Maker Interchange Format) in which case you can open it with any lower version of FrameMaker.
The main sticking point with saving to MIF is that you have to remember to do it. But with ExtendScript, you can automate this. You can create a script that will automatically save the document to MIF whenever you choose File > Save or press Control+S. When you are ready to pass the MIF file onto another team member that may be using a lower FrameMaker version, you know that it will always reflect the latest saved changes.
Here is how to set up the script below:
Notification (Constants.FA_Note_PostSaveDoc, true);


function Notify (note, object, sparam, iparam) {


    switch (note) {

        case Constants.FA_Note_PostSaveDoc :

        saveAsMif (object);

        break;

    }

}


function saveAsMif (doc) {


	// Get required parameters for the save function.

    var params = GetSaveDefaultParams();

    var returnParamsp = new PropVals();


    // Replace the .fm extension with .mif.

    var saveName = doc.Name.replace (/\.[^\.\\]+$/,".mif");


    // Get the FileType save parameter and set it to MIF.

    var i = GetPropIndex(params, Constants.FS_FileType);

    params[i].propVal.ival = Constants.FV_SaveFmtInterchange;


    // Save the document as MIF.

    doc.Save(saveName, params, returnParamsp);

}
Changes to the structure of your document should be made on the Master pages. By default, a single sided document will only have a master page title "Right". A double-sided document would then have a "Right" and a "Left" master page. You can add as many master pages as you need for a document, however when you are writing text and come to the end of a page, by default Frame will create a new page using the format from the left or right master page.
You should think of the master page as including any information that you need for any and all pages of a single format. This would include headers/footers and the layout of the text on a page (for instance, the margins, or number of columns on a page).
Once the changes to a master page are made, they may need to be applied to the appropriate body pages in your document. You should only explicitly change a body page if you know that the change is only for that page, and that any changes to the document are not going to require those changes be undone.
In the body pages you should only include the body of the document, such as any text, figures, tables, etc. that you may need to include. Since these are generally not duplicated, there is no need to place the information on a master page.
Промените в структурата на вашия документ трябва да се правят на основните страници. По подразбиране едностранен документ ще има само основна страница със заглавие „Right“ (Дясна). Двустранен документ тогава ще има „Right“ и „Left“ (Дясна и Лява) основни страници. Можете да добавите колкото основни страници са ви необходими за даден документ, но когато пишете текст и стигнете до края на страница, по подразбиране Frame ще създаде нова страница, използвайки формата от лявата или дясната основна страница.
Трябва да мислите за основната страница като включваща всяка информация, която ви е нужна за всички страници от един формат. Това би включвало горни и долни колонтитули и оформлението на текста на страница (например полетата или броя на колоните на страница).
След като промените в основна страница са направени, може да се наложи те да бъдат приложени към съответните страници на тяло във вашия документ. Трябва изрично да променяте страница на тяло само ако знаете, че промяната е само за тази страница и че всички промени в документа няма да изискват тези промени да бъдат отменени.
На страниците на тяло трябва да включвате само тялото на документа, като текст, фигури, таблици и т.н., които може да е нужно да включите. Тъй като те обикновено не са дублирани, няма нужда информацията да се поставя на основна страница.
Понякога е полезно да копирате или изрежете променлива в клипборда за поставяне. Поставянето може да се направи докато пишете за лесно вмъкване на променливи. Поставянето може да се направи и чрез прозореца Find/Change. Пример за това кога бихте могли да използвате Find/Change е, ако сте решили да замените често срещана фраза в документ с променлива и сте искали бързо да промените всички появявания.
За да поставите променливи на FrameMaker в клипборда (за да могат след това да бъдат поставени), първо трябва да изберете променливата. За да направите това, кликнете веднъж, така че променливата да бъде маркирана, но диалоговият прозорец на променливата да не се отвори. Или изрежете (CTRL-V), или копирайте (CTRL-C), и променливата ще бъде в клипборда, готова за поставяне.
Когато поставите, променливата трябва да се появи във вашия документ в точката на вмъкване. Ако поставяте в параграфи, които използват същия шрифт по подразбиране като параграфа, от който сте копирали, няма да имате проблеми.
Ако обаче поставите променлива в параграфи с различни размери или шрифтове на текста, вашата променлива няма винаги да съответства на заобикалящия я текст. Решението за това е да предефинирате променливата си, така че тя автоматично да съответства на текста, в който е поставена. (Това ще бъде много по-лесно от преформатирането на ръка!) Предефинирайте променливата си, така че дефиницията ѝ да започва със строителния блок:
Дори ако използвате тег на знак във вашата дефиниция, това ще работи. Просто се уверете, че другият ви таг се появява след горния строителен блок.
Забележка: Ако се каните да проектирате шаблон, добра практика е да дефинирате всички променливи да започват с
Sometimes it is helpful to Copy or Cut a Variable to the clipboard for Pasting. Pasting may be done as you type for easy Variable insertion. Pasting may also be done through the Find/Change window. An example of when you might use the Find/Change would be if you decided to replace a frequently-occurring phrase in a document with a Variable and wanted to quickly change all occurrences.
To place FrameMaker Variables on the clipboard (so they may then be Pasted), you must first select the Variable. To do this, click once so that the Variable highlights but the Variable dialog box does not open. Either Cut (CTR-V) or Copy (CTRL-C) and the Variable will be on the clipboard, ready to Paste.
When you Paste, the Variable should drop into your document at your insertion point. If you are Pasting into paragraphs that use the same default font as the paragraph you Copied from, you will have no problems.
If, however, you Paste a Variable into paragraphs with different text sizes or fonts, your Variable will not always match the text around it. The fix for this is to redefine your Variable so that it will automatically match text it is Pasted into. (This will be much easier than reformatting by hand!) Redefine your Variable so that its definition begins with the building block:
Even if you are using a Character Tag in your definition, this will work. Just make sure your other tag appears after the building block above.
Note: If you are about to design a template, it is a good practice to define all the Variables to start with
Frame не ви позволява просто да зададете междуредието на документ да бъде единично или двойно. Вместо това можете ефективно да зададете междуредието за таг на параграф или тип (напр. Body) по един от два начина.
Един начин за задаване на междуредието е да преместите текстовия курсор в параграф и да изберете опцията от менюто Format -> Paragraph -> Designer.
В полето Line Spacing изберете стойността в пункта, която съответства на единично, 1,5 или двойно междуредие. След това, за да зададете стойността на междуредието само за този параграф, кликнете върху бутона Apply. За да зададете междуредието за всички параграфи, означени със същото име, кликнете върху бутона Update All.
Другият начин за промяна на междуредието за отделен параграф е да преместите курсора в този параграф, да кликнете върху бутона с хоризонтални линии върху него, разположен под менютата Format и View, и да изберете желаното междуредие.
Frame does not allow you to simply set a document's line spacing to be single or double-spaced. Instead, you can effectively set the line spacing for a paragraph tag or type (e.g. Body) in one of two ways.
One way to set the line spacing is to move the text cursor into a paragraph and select the Format -> Paragraph -> Designer menu option.
In the Line Spacing field, select the point value which corresponds to single, 1.5, or double line spacing. Then, to set the spacing value for this paragraph only, click on the Apply button. To set the spacing for all paragraphs tagged with the same name, click on the Update All button.
The other way to change the line spacing for an individual paragraph is to move the cursor to that paragraph, click on the button with horizontal lines on it, located under the Format and View menus, and choose the line spacing you desire.
Има редица различни методи за промяна на полетата във FrameMaker. Ето два:
1) Отидете в менюто Format и изберете „Page Layout->Column Layout“.
Това ще отвори изскачащ прозорец. В прозореца преминете към секцията „Column Margins“ и задайте полетата Top, Bottom, Left или Right на предпочитания от вас размер. След това кликнете върху „Update Entire Flow“, за да направите промените си да влязат в сила за всички ваши страници.
2) Изберете текстовата колона, за която искате да промените полето (Ctrl-click). Ще забележите, че кутията за избор има малки черни квадратчета около нея. За да преместите ръба на колоната, преместете мишката над едно от тези черни кутийки. Показалецът на мишката ще се промени в стрелка, сочеща в посоката на ръба. Кликнете с левия бутон и плъзнете ръба, докато го имате на желаното място. За точност има референтна линия, която се движи по горната част на линията.
Ако направите това на една страница на тяло, то ще промени полетата на тази страница на тяло. Ако направите това на основна страница, то ще промени полетата на всички страници, свързани с тази основна страница.
There are a number of different methods for changing the margins in FrameMaker. Here are two:
1) Go to the Format menu and choose "Page Layout->Column Layout".
This will bring up a popup window. In the window, move to the "Column Margins" section, and set the Top, Bottom, Left or Right margins to your preferred size. Then click on "Update Entire Flow" to make your changes take effect for all your pages.
2) Select the text column for which you wish to change the margin (Ctrl-click). You will notice that the select box has small black squares all around it. To move the edge of the column move the mouse over one of these black boxes. The mouse pointer will change to an arrow pointing in the direction of the edge. Click the left button and slide the edge until you have it at the desired side. For accuracy there is a reference line that moves along the top of the ruler.
If you do this to a single body page, it will change the margins on that body page. If you do this to a master page, it will change the margins on all the pages associated with that master page.
Промяната на настройките за пагинация на параграф ви позволява да указвате неща като „Главата винаги трябва да започва на нова страница“ или „Фигурен параграф трябва да обхваща и двете колони на документ с две колони“. Опциите, които можете да изберете тук, са:
Start: Това ви позволява да указвате конкретни начални места за параграф. Например, ако искате всички нови глави да започват в началото на нова страница, бихте избрали Top of Page. Другите опции включват: Top of Column, Top of Left Page, Top of Right Page, Anywhere и As is.
Keep With: Това ви позволява да укажете, че параграфът остава свързан с параграфа преди или след него.
Widow/Orphan Lines: Това число указва броя на редовете от параграф, които трябва да останат сами в края на страница (орфан) или в началото на следващата страница (вдовица).
In Column: Това поставя параграфа в текстова колона (стандарт).
Run-In-Head: Това създава „run-in“ заглавие (не на
отделен ред от последващия текст). Можете да укажете пунктуация, която винаги следва заглавието (като точка или двоеточие), която ще бъде добавена, освен ако заглавният текст няма собствена пунктуация.
Side Head - Alignment: Това създава странично заглавие, обикновено разположено вляво от тялото на текста. Подравняването указва как заглавието ще бъде разположено спрямо тялото; „top edge“ ще подравни горните ръбове на заглавието и тялото, „last baseline“ ще подравни долната част на заглавието с горната част на тялото, а „first baseline“ ще подравни
долната част на първия ред на заглавието с горния ред на тялото.
ЗАБЕЛЕЖКА: ако искате да използвате Side Heads, уверете се, че сте включили „Room for Side Heads“ в Format -> Page Layout -> Column Layout
Across All Columns: Това поставя параграфа през всички колони на документа (макар и не през пространството, разпределено за Side Heads)
Across All Columns And Side Heads: Това поставя параграфа през всички колони на документа, както и през пространството, запазено за Side Heads.
As Is: Бихте използвали тази опция, когато сте избрали параграфи с различни свойства на пагинация и искате те да запазят свойствата, които имат в момента.
Changing the pagination settings for a paragraph allows you to specify things like "A chapter heading must always start a new page" or "A figure paragraph should span both columns of a two-column document". The options you can select here are:
Start: This allows you to specify specific staring places for a paragraph. For example, if you wanted to have all new chapters start at the beginning of a new page, you would select Top of Page. Other options include: Top of Column, Top of Left Page, Top of Right Page, Anywhere, & As is.
Keep With: This allows you to specify that a paragraph remains connected to the paragraph before or after it.
Widow/Orphan Lines: This number indicates the number of lines of a paragraph that have to remain together alone at the end of a page (orphan) or the beginning or the next page (widow).
In Column: This places the paragraph in a text column (standard).
Run-In-Head: This creates a run-in heading (not on
a separate line from the following text). You can specify punctuation which always follows the heading (like a period or a colon), which will be added unless the header text has its own punctuation.
Side Head - Alignment: This creates a side heading, typically placed to the left of the body text. The alignment specifies how the header will be placed with respect to the body; "top edge" will align the top edges of heading and body, "last baseline" will align the bottom of the heading with the top of the body, and "first baseline" will align the
bottom of the first line of the heading with the top line of the body.
NOTE: if you want to use Side Heads, make sure to turn on "Room for Side Heads" in the under Format -> Page Layout -> Column Layout
Across All Columns: This places the paragraph across all columns of the document (though not across the space allotted for Side Heads)
Across All Columns And Side Heads: This places the paragraph across all columns of the document, as well as across the space reserved for Side Heads.
As Is: You would use this option when you have selected paragraphs with different pagination properties, and you want them to keep the properties that they currently have.
If you accidentally, or perhaps on purpose, locked a Frame document when you saved it, to unlock it you will need to open the document and, with the mouse in the document window, type the following in order to unlock it:
Ctrl-r F l k
Note that the F is capital, and the r, l, and k are not. This key binding is actually a toggle, so you can lock the file again by repeating it.
Ако случайно или може би нарочно сте заключили Frame документ, когато сте го запазили, за да го отключите, ще трябва да отворите документа и с мишката в прозореца на документа да въведете следното, за да го отключите:
Ctrl-r F l k
Имайте предвид, че F е главно, а r, l и k не са. Тази клавишна комбинация всъщност е превключвател, така че можете да заключите файла отново, като я повторите.
There is no way in frame to generate an automatic bibliography for your document. The bibliography can be done by hand, in which case you will have to add the citations yourself, or with the help of a BibFrame. BibFrame will try to generate bibliographies for you, but it does not work perfectly. Once you are finished, you will want to edit the bibliography to find any mistakes that BibFrame made.
To use BibFrame, you will first need to create a .bib file with entries in it for all of the sources you would like to cite. For information on how to create this file, consult the stock answer entitled "How to make BIBLIOGRAPHIES in Latex" under the Latex topic.
Once you have a .bib file, you can create the citations by typing the "key" for the bibliography entry where you would like it to be cited. Then, highlight the key and hit C-r b m. This will run a macro which will zip through a bunch of menus and beep. Repeat this process for all your citations in all your files.
Next, you need to generate the bibliography. First set the environment variable BIBFRAMEREF to the comma separated list of file names without the .bib extension. For example, if my .bib file is
/mit/dot/thesis/thesisbib.bib, I would type
athena% setenv BIBFRAMEREF "/mit/dot/thesis/thesisbib"
Secondly, choose the style of citations you wish to use and set the variable BIBFRAMEBST accordingly:
athena% setenv BIBFRAMEBST "mmlunsrt"
Note that possible citation styles are:
mmlabbrv mmlalpha mmldraft
mmllongkey mmlmapalike mmlplain
mmlquoteabbrv mmlquotelongkey mmlquoteplain
mmlquoteunsrt mmlunsrt
Next, open the file that you want to contain your bibliography. If you are generating a bibliography for a book, this should be a separate FrameMaker document. In this case, you should copy a template bibliography file from the templates locker:
athena% attach templates
athena% cd directory-with-your-frame-files
athena% cp /mit/templates/frame5/Bibframe/biblio.doc.
For a single document file, go to the place you want to insert your bibliography. Create a new paragraph tag (Format -> Paragraphs -> Designer) called "Reference" (it doesn't matter what the settings are) and apply it to this empty paragraph. Finally, in the same xterm that you typed the setenv commands, run the bibframe command:
athena% add frame
athena% bibframe < list of files >
e.g.
athena% bibframe biblio.doc chap1.doc chap2.doc ... chapn.doc
Няма начин във Frame да се генерира автоматично библиография за вашия документ. Библиографията може да бъде направена на ръка, в който случай ще трябва сами да добавите цитатите, или с помощта на BibFrame. BibFrame ще се опита да генерира библиографии за вас, но не работи перфектно. След като приключите, ще искате да редактирате библиографията, за да откриете всички грешки, които BibFrame може да е направил.
За да използвате BibFrame, първо ще трябва да създадете .bib файл с записи в него за всички източници, които искате да цитирате. За информация как да създадете този файл, консултирайте се със стандартния отговор „How to make BIBLIOGRAPHIES in Latex“ под темата Latex.
След като имате .bib файл, можете да създадете цитатите, като въведете „ключа“ за записа в библиографията, където искате да бъде цитиран. След това маркирайте ключа и натиснете C-r b m. Това ще изпълни макрос, който ще премине през куп менюта и ще изпиука. Повторете този процес за всички свои цитати във всички ваши файлове.
След това трябва да генерирате библиографията. Първо задайте променливата на средата BIBFRAMEREF на списъка със запетая разделени имена на файлове без разширението .bib. Например, ако моят .bib файл е
/mit/dot/thesis/thesisbib.bib, бих написал
athena% setenv BIBFRAMEREF "/mit/dot/thesis/thesisbib"
Второ, изберете стила на цитатите, който желаете да използвате, и задайте променливата BIBFRAMEBST съответно:
athena% setenv BIBFRAMEBST "mmlunsrt"
Имайте предвид, че възможните стилове на цитати са:
mmlabbrv mmlalpha mmldraft
mmllongkey mmlmapalike mmlplain
mmlquoteabbrv mmlquotelongkey mmlquoteplain
mmlquoteunsrt mmlunsrt
След това отворете файла, в който искате да се съдържа вашата библиография. Ако генерирате библиография за книга, това трябва да бъде отделен FrameMaker документ. В този случай трябва да копирате шаблонен файл за библиография от хранилището с шаблони:
athena% attach templates
athena% cd directory-with-your-frame-files
athena% cp /mit/templates/frame5/Bibframe/biblio.doc.
За единичен документ, отидете на мястото, където искате да вмъкнете вашата библиография. Създайте нов таг на параграф (Format -> Paragraphs -> Designer) с име „Reference“ (не е важно какви са настройките) и го приложете към този празен параграф. Накрая, в същия xterm, където сте въвели командите setenv, изпълнете командата bibframe:
athena% add frame
athena% bibframe < list of files >
напр.
athena% bibframe biblio.doc chap1.doc chap2.doc ... chapn.doc
FrameMaker, PageMaker и InDesign са насочени към уникални и различни издателски аудитории. Всеки продукт е оптимизиран за поддръжка на целевите си потребители. Софтуерът FrameMaker 7.0 е оптимизиран за поддръжка на работен процес, задвижван от шаблони, при който страниците се форматират и оформят автоматично чрез използването на шаблон; софтуерите PageMaker и InDesign са оптимизирани за поддръжка на работен процес, задвижван от дизайна, който разчита на уменията и преценката на потребителя да поставя и форматира активи на страница. Друга разлика е, че софтуерът FrameMaker включва пълна среда за създаване на съдържание, в която потребителите могат да разработват своето съдържание; при софтуерите PageMaker и InDesign създаването на текст по-често се извършва независимо от процеса на оформление, използвайки различен инструмент, като например текстообработваща програма. Типичните потребители на всяко приложение имат значително различни профили, а видовете създавани публикации също са доста уникални за всеки инструмент.
Read moreFrameMaker, PageMaker and InDesign are targeted for unique and different publishing audiences. Each product is optimized to support its intended users. FrameMaker 7.0 software is optimized to support a template-driven workflow, where pages are formatted and laid out automatically through the use of a template; PageMaker and InDesign software are optimized to support a design-driven workflow, which relies on the skill and judgment of the user to place and format assets on a page. Another difference is that FrameMaker software includes a complete authoring environment in which users can develop their content; with PageMaker and InDesign software, text authoring is more commonly performed independently of the layout process using a different tool, such as a word processor. The typical users of each application have significantly different profiles, and the types of publications created are also quite unique to each tool.
Read moreФилтри, които улесняват директното импортиране на PageMaker или QuarkXPress файлове във FrameMaker, не се предоставят във FrameMaker 7.0. Има обаче разнообразие от методи за прехвърляне на съдържанието на книга от PageMaker или QuarkXPress във FrameMaker. Те включват:
Filters that facilitate the direct import of PageMaker or QuarkXPress files into FrameMaker are not provided in FrameMaker 7.0. However there are a variety of methods to move the contents of a book from PageMaker or QuarkXPress into FrameMaker. These include:
Въпреки че и FrameMaker 7.0, и FrameMaker Server 7.0 софтуерите споделят една и съща технология и дори един и същ инсталационен CD, основната разлика между двата продукта е позволеното използване, за което са лицензирани.
Софтуерите FrameMaker 7.0 и FrameMaker Server 7.0 включват набор от мощни, висококачествени функции за производство на печат и PDF изход. Софтуерът FrameMaker 7.0 обаче е проектиран да бъде използван интерактивно от потребители на техните работни плотове. Той включва напълно интерактивна, WYSIWYG среда за създаване на съдържание, заедно с гама от инструменти за публикуване към множество медии — по-специално софтуерът WebWorks Publisher Standard Edition 7.0 от Quadralay, който позволява на потребителите да публикуват в HTML, Palm Reader и Microsoft Reader формати. Софтуерът FrameMaker Server 7.0, от друга страна, е проектиран да бъде използван програмно в базирана на сървър или автоматизирана среда. Frame Development Kit (FDK) е основното средство за задвижване на приложението. Софтуерът FrameMaker Server е специално проектиран да предоставя базирани на сървър функции за печат и PDF изход.
FrameMaker Server 7.0 е двигател за печат и PDF публикуване, който работи в базирана на сървър или автоматизирана среда. Софтуерът FrameMaker Server е проектиран за интеграция с разнообразие от източници на данни, включително бази данни, сървъри за приложения и уеб услуги. Богат набор от опции за импорт, който включва XML и Maker Interchange Format (MIF), е допълнен от мощен, цялостен и добре документиран Application Programming Interface (API), известен като Frame® Development Kit (FDK). FDK може да бъде изтеглен от www.adobe.com.
Приложенията за FrameMaker Server включват каталожно публикуване, публикуване от бази данни и производство на персонализирани документи и персонализирани eBooks. За повече информация вижте уеб страниците на FrameMaker Server.
FrameMaker Server 7.0 is a print and PDF publishing engine that runs in a server-based or automated environment. FrameMaker Server software is designed for integration with a variety of data sources, including databases, application servers and web services. A rich array of import options that includes XML and Maker Interchange Format (MIF) is complemented by a powerful, comprehensive and well-document Application Programming Interface (API) known as the Frame® Development Kit (FDK). The FDK is downloadable from www.adobe.com.
Applications for FrameMaker Server include catalog publishing, database publishing, and the production of personalized documents and custom eBooks. For more information, see the FrameMaker Server Web pages.
Although both FrameMaker 7.0 and FrameMaker Server 7.0 software share the same technology and even the same installation CD, the primary difference between the two products is the permitted use for which they are licensed.
Both FrameMaker 7.0 and FrameMaker Server 7.0 software include a set of powerful, high-quality features for producing print and PDF output. FrameMaker 7.0 software, however, is designed to be used interactively by users on their desktops. It includes a fully interactive, WYSIWYG authoring environment, along with a range of tools for publishing to multiple media-particularly WebWorks Publisher Standard Edition 7.0 software from Quadralay, which enables users to publish to HTML, Palm Reader and Microsoft Reader formats. FrameMaker Server 7.0 software, on the other hand, is designed to be used programatically in a server-based or automated environment. The Frame Development Kit (FDK) is the primary means for driving the application. FrameMaker Server software is specifically designed to provide server-based features for print and PDF output.
За да създадете достъпни PDF документи, можете да създадете съдържанието си във FrameMaker 7.0 и след това да генерирате Tagged PDF файл, който може да бъде показан на широк спектър от достъпни устройства за разглеждане. За да създадете достъпни HTML документи, можете да поставите всички графики във вашата FrameMaker публикация в закотвени рамки и да използвате алтернативни текстови тагове за добавяне на вербални описания. След това можете да използвате Adobe GoLive, за да създадете персонализиран шаблон за WebWorks Publisher Standard Edition, който съдържа големи размери на шрифта и висококонтрастни графики, и да използвате този шаблон за генериране на вашите HTML файлове.
Read moreTo create accessible PDF documents, you can author your content in FrameMaker 7.0 and then generate a Tagged PDF file, which can be displayed on a broad range of accessible viewing devices. To create accessible HTML documents, you can place all of the graphics in your FrameMaker publication in anchored frames and use alternate text tags to add verbal descriptions. Then, you can use Adobe GoLive to create a custom template for WebWorks Publisher Standard Edition that contains large font sizes and high-contrast graphics, and use that template to generate your HTML files.
Read moreСтандартът XML дефинира метод за описание на структурирано съдържание, използвайки ASCII текстово базиран синтаксис от тагове на елементи, атрибути и кодирания на знаци. И софтуерът InDesign 2.0, и софтуерът FrameMaker 7.0 могат да четат и записват съдържание на документи в XML. Двете приложения обаче се различават значително в техните функции, които поддържат обработката на XML съдържание на документи. Софтуерът InDesign е предназначен главно за графични професионалисти, които трябва да импортират и експортират XML съдържание и да картират това съдържание към техните страници дизайни. Софтуерът InDesign 2.0 поддържа well-formed XML, чийто „свободно течащ“ подход е подходящ за общността на графичните изкуства.
Софтуерът FrameMaker 7.0 предлага различно ниво на поддръжка за XML, което отразява нуждите на целевите му потребители за валиден XML. XML е валиден, ако отговаря на набора от правила, изложени за типа обработван документ, който обикновено се дефинира в Document Type Definition (DTD). Софтуерът FrameMaker може автоматично да определя DTD-то, което е приложимо за конкретен XML документ, и да валидира съдържанието за съответствие с DTD, когато чете и записва XML. Софтуерът FrameMaker също предоставя език за стилизиране, който е описан в Element Definition Document (EDD), и метод за картиране на XML елементи към FrameMaker елементи на документ, като маркери, кръстосани препратки, таблици и графики, който е дефиниран в набор от правила Read/Write. За създаване на съдържание, софтуерът FrameMaker предоставя структурирана среда за създаване, която тясно интегрира WYSIWYG режима на редактиране с прозореца Structure View, който предоставя визуален дисплей, поддържащ създаването на валидно съдържание чрез предоставяне на непрекъсната валидация и насочвано редактиране. Софтуерът FrameMaker 7.0 също включва инструменти за структуриране на наследено неструктурирано съдържание, което преди това е било таговано със стилове за форматиране. Възможно е също така да се чете и записва well-formed XML, докато работите в неструктурирания режим на създаване.
The XML standard defines a method of describing structured content using an ASCII text-based syntax of element tags, attributes and character encodings. Both InDesign 2.0 software and FrameMaker 7.0 software can read and write document content in XML. However, the two applications vary considerably in their features that support the processing of XML document content. InDesign software is primarily intended for graphics professionals who need to import and export XML content and to map that content to their page designs. InDesign 2.0 software supports well-formed XML, whose "free flow" approach is suitable for the graphic arts community.
FrameMaker 7.0 software offers a different level of support for XML that reflects the needs of its target users for valid XML. XML is valid if it conforms to the set of rules laid out for the type of document being processed that is typically defined in a Document Type Definition (DTD). FrameMaker software can automatically determine the DTD that is applicable to a specific XML document and validate the content for conformance to the DTD when it reads and writes XML. FrameMaker software also provides a styling language that is described in an Element Definition Document (EDD), and a method for mapping XML elements to FrameMaker document elements, such as markers, cross-references, tables and graphics that is defined in a set of Read/Write Rules. For content creation, FrameMaker software provides a structured authoring environment that tightly integrates the WYSIWYG editing mode with the Structure View window, which provides a visual display that supports the creation of valid content by providing continuous validation and guided editing. FrameMaker 7.0 software also includes tools for structuring legacy unstructured content that has previously been tagged with formatting styles. It is also possible to read and write well-formed XML while working in the Unstructured authoring mode.
Building on the PDF metadata scheme supported by previous versions of FrameMaker, version 7.0 now supports the XMP (eXtensible Metadata Platform) standard for describing asset properties to increase their usability in a collaborative production workflow. This enables you to work more effectively with content management systems and to enable the customization and dynamic assembly of content to end users. You can add XMP metadata to the files you create with FrameMaker 7.0 by using the File Info dialog box.
Read moreTagged PDF files incorporate information introduced in the new PDF 1.4 specification that identifies a publication's layout elements and contents and the visual relationships between them. This allows logical reflow of tagged PDF files during viewing on a broad range of devices with widely varying screen sizes. Tagged PDF files can be read on popular handheld computers and ultra-compact laptops as well as on many types of accessible viewing devices.
Read moreБазирайки се на схемата за PDF метаданни, поддържана от предишни версии на FrameMaker, версия 7.0 сега поддържа стандарта XMP (eXtensible Metadata Platform) за описание на свойствата на активи, за да се увеличи тяхната използваемост в съвместен производствен работен процес. Това ви позволява да работите по-ефективно със системи за управление на съдържанието и да активирате персонализирането и динамичното сглобяване на съдържание за крайните потребители. Можете да добавите XMP метаданни към файловете, които създавате с FrameMaker 7.0, използвайки диалоговия прозорец File Info.
Read moreTagged PDF файловете включват информация, въведена в новата спецификация PDF 1.4, която идентифицира елементите на оформлението на публикацията и съдържанието ѝ, както и визуалните връзки между тях. Това позволява логическо преформатиране на tagged PDF файлове по време на преглед на широк спектър от устройства с много различни размери на екрана. Tagged PDF файловете могат да бъдат четени на популярни преносими компютри и свръхкомпактни лаптопи, както и на много видове достъпни устройства за разглеждане.
Read moreAdobe is unable to certify FrameMaker 7.0 software for use on PostScript Level 1 printers. These older printers are increasingly difficult to find and maintain, and do not support modern network protocols. FrameMaker 7.0 software has been tested so infrequently on PostScript Level 1 printers that these output devices are no longer supported for use with FrameMaker.
On the Macintosh and Windows platforms, you may be able to print FrameMaker 7.0 files to a PostScript Level 1 printer without any significant problems if you have the appropriate printer driver installed on your system. On the UNIX platform, there are no known issues when FrameMaker 7.0 software directly generates PostScript Level 1. If you use any Placed PDF files that contain color or transparency information that cannot be correctly rendered for PostScript Level 1, these images may not appear as expected.
Adobe не може да сертифицира софтуера FrameMaker 7.0 за използване с PostScript Level 1 принтери. Тези по-стари принтери стават все по-трудни за намиране и поддържане и не поддържат съвременни мрежови протоколи. Софтуерът FrameMaker 7.0 е тестван толкова рядко на PostScript Level 1 принтери, че тези изходни устройства вече не се поддържат за използване с FrameMaker.
На платформите Macintosh и Windows може да успеете да отпечатате файлове на FrameMaker 7.0 на PostScript Level 1 принтер без значителни проблеми, ако имате инсталиран подходящ драйвер за принтер във вашата система. На платформата UNIX няма известни проблеми, когато софтуерът FrameMaker 7.0 генерира директно PostScript Level 1. Ако използвате поставени PDF файлове, които съдържат информация за цвят или прозрачност, която не може да бъде правилно рендирана за PostScript Level 1, тези изображения може да не се появят според очакванията.
SGML (Standard Generalized Markup Language) is a system for organizing documents by specifying rules for tagging content elements, for example, body text, heads, and footnotes. HTML (HyperText Markup Language) and XML (eXtensible Markup Language), both languages used for creating Web pages, are subsets of SGML.
A tag is nothing more than a command placed inside a text document that specifies how an element should be formatted. The tags contain no formatting information -- the user is free to create any format definition for any tag. When such a text file is read, or interpreted by software such as a Web browser, the material is presented according to the formats defined within the file. For example, when the browser sees an H1 tag, it looks up the formatting specifications for H1 (let's say 20-point Arial) and then displays the element accordingly.
SGML also lets you specify rules, for example, that an H1 tag is always followed by body text or a List tag cannot contain an H1 tag. These rules are contained in file called a DTD (Document Type Definition) and assure that the final document will be uniform, regardless of who is editing or authoring the content. SGML is used to organize, or structure long documents whose sections may be written by different authors, are frequently revised, and are output in assorted formats (print and Web, for example). The advantage of an SGML structured document is that the structure and format specifications are built-in, so no matter how many people work on the project, the organization of material and appearance remain consistent. Needless to say, SGML is popular with companies that build complex machines that need extensive documentation written by hordes of engineers. As a result it operates on Unix as well as Windows and Mac operating systems.
FrameMaker imports and exports both SGML or XML structured documents and includes a standard set of structured templates for common publishing tasks. These templates include the element definitions required to produce consistent structured documents (see Figure 1).
SGML (Standard Generalized Markup Language) е система за организиране на документи чрез указване на правила за таговане на елементи от съдържанието, например тяло на текста, заглавия и бележки под линия. HTML (HyperText Markup Language) и XML (eXtensible Markup Language), и двата езика, използвани за създаване на уеб страници, са подмножества на SGML.
Тагът не е нищо повече от команда, поставена вътре в текстов документ, която указва как даден елемент трябва да бъде форматиран. Таговете не съдържат информация за форматиране — потребителят е свободен да създава всякаква дефиниция на формат за всеки таг. Когато такъв текстов файл бъде прочетен или интерпретиран от софтуер като уеб браузър, материалът се представя според форматите, дефинирани във файла. Например, когато браузърът види H1 таг, той търси спецификациите за форматиране за H1 (да кажем, Arial 20 точки) и след това показва елемента съответно.
SGML също ви позволява да указвате правила, например, че H1 таг винаги се следва от тяло на текст или че List таг не може да съдържа H1 таг. Тези правила се съдържат във файл, наречен DTD (Document Type Definition), и гарантират, че крайният документ ще бъде еднороден, независимо от това кой редактира или създава съдържанието. SGML се използва за организиране или структуриране на дълги документи, чиито секции могат да бъдат написани от различни автори, често се преразглеждат и се извеждат в разнообразни формати (например печат и уеб). Предимството на структурирания SGML документ е, че спецификациите за структура и формат са вградени, така че независимо от това колко хора работят по проекта, организацията на материала и външният вид остават последователни. Няма нужда да се казва, че SGML е популярен сред компаниите, които произвеждат сложни машини, нуждаещи се от обширна документация, написана от орди инженери. В резултат на това той работи както на Unix, така и на операционните системи Windows и Mac.
FrameMaker импортира и експортира както SGML, така и XML структурирани документи и включва стандартен набор от структурирани шаблони за общи издателски задачи. Тези шаблони включват дефинициите на елементите, необходими за производството на последователни структурирани документи (вижте Фигура 1).
FrameMaker включва филтри за импортиране и експортиране на Microsoft Word и Interleaf/Quicksilver ASCII файлове. Стратегията включва две основни стъпки: подготовка на файла в Interleaf/Quicksilver и след това завършване на конверсията във FrameMaker.
Конверторите трябва да изпълняват тестове и да разработят работен лист, който отговаря на общи проблеми, преди да разпространят задачите по конверсия в група.
Основният пакет Interleaf/Quicksilver включва експортен филтър за Interleaf ASCII Format, или IAF. FrameMaker не може да импортира директно Interleaf/Quicksilver документи, но може да импортира IAF файлове. Този формат ще прехвърли текст и таблици, но може да бъде проблематичен с графики. Опционален Interleaf/Quicksilver филтърен пакет експортира файлове в Maker Interchange Format (MIF), което е еквивалентът на IAF в софтуера FrameMaker. Този формат може да даде доста добри резултати при конверсия.
Подготовка на Interleaf/Quicksilver. LISP е езикът за програмиране на Interleaf/Quicksilver и LISP скриптове могат да бъдат използвани за автоматизиране на извличането на данни. Области, където скриптингът може да бъде полезен:
Полиране на файла във FrameMaker. След като файлът е подготвен и експортиран от Interleaf/Quicksilver, той се внася във FrameMaker.
За да се намали досадата на конвертирането, е наличен език за скриптове за FrameMaker, наречен FrameScript, който е наличен от Finite Matters Ltd. FrameScripts могат да автоматизират повтарящи се задачи.
Области, където може да е необходимо финално почистване:
Уравненията не се поддържат от много филтърни приложения, въпреки че FrameMaker включва редактор на уравнения за пресъздаване на уравнения в документи. Времето, необходимо за конвертиране на документ, зависи от много фактори, включително сложността на документа, неговата дължина и уменията на лицето, извършващо работата.
Read moreFrameMaker includes filters for importing and exporting Microsoft Word and Interleaf/Quicksilver ASCII files. The strategy involves two major steps: prep the file within Interleaf/Quicksilver, and then finish the conversion within FrameMaker.
Converters should run tests, and develop a worksheet that answers common problems before rolling out conversion tasks across a group.
The basic Interleaf/Quicksilver package includes an export filter for Interleaf ASCII Format, or IAF. FrameMaker cannot import Interleaf/Quicksilver documents directly, but can import IAF files. This format will bring across text and tables, but can be problematic with graphics. An optional Interleaf/Quicksilver filter pack exports files to Maker Interchange Format (MIF), which is FrameMaker software's equivalent of IAF. This format can produce quite good conversion results.
Interleaf/Quicksilver preparation. LISP is the Interleaf/Quicksilver programming language, and LISP scripts can be used to automate data extraction. Areas where scripting may be useful:
Polishing the file in FrameMaker. Once the file has been prepped and exported out of Interleaf/Quicksilver, it is then brought into FrameMaker.
To reduce the tedium of converting, a scripting language is available for FrameMaker called FrameScript, which is available from Finite Matters Ltd. FrameScripts can automate repetitive tasks.
Areas where final cleanup may be needed:
Equations are not supported by many filter applications, although FrameMaker includes an equation editor for recreating equations in documents. The time required to convert a document depends on many factors, including the complexity of the document, its length and the skill of the person performing the work.
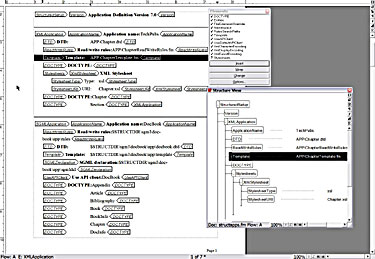
Read moreA structured document is a document that can be viewed in several ways: as an author, a publisher, or a viewer. SGML, XML, and HTML are examples of structured documents. XML is used in this tutorial to demonstrate the Structured FrameMaker feature.
Structured documents, such as XML files, are created using elements. When working with XML files, the element definitions and structural information is stored in a Document Type Definition (DTD). When working with structured document in FrameMaker, the element definitions and structural information is stored in an Element Definitions Document (EDD). The EDD also contains formatting and style information. When you create a structured document in FrameMaker, you must associate an EDD to the document.
Changing the Product Interface
Before you begin working with structured documents, you must change the interface to Structured FrameMaker.
To change the interface:
Creating a Structured Document using a Standard Template
You cannot create a new structured document within FrameMaker without first creating an EDD. EDDs are usually created by an application developer and are outside the scope of this tutorial.
To create a structured document using a template:
Opening the Structure View
The Structure View provides a hierarchical representation of the document structure and shows the relationship of the elements that are currently used in the document.
To open the Structure View dialog box, click 
located on the right side of the document window.
The Structure View dialog box appears.
Opening the Element Catalog
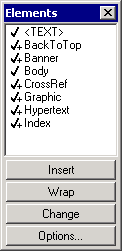
The Element Catalog provides a list of all elements that are available for use within the structured document.
To open the Element Catalog and display all elements:
 located on the right side of the document window.
Displaying Element Boundaries as Tags
To display element tags:
Inserting Elements and Attributes
When you place your cursor within the tags of a structured document, the list of valid elements change. These elements are displayed with a check mark within the Element Catalog. If you insert an element that is not valid, your document is no longer structured.
To insert elements:
Validating a Structured Document
To verify the structure of your document, you must validate it. Validating your document ensures that all constraints defined for your document have been met. A document is not structured if does not pass validation.
To validate a structured document:
Saving a Structured Document as an XML file
The best way to save a structured document as an XML file using FrameMaker is to export the file into WebWorks Publisher Standard Edition. This application is shipped with FrameMaker, but installed separately. You must have WebWorks Publisher installed to complete this procedure.
To save a structured document as an XML file using WebWorks Publisher Standard Edition:
Структуриран документ е документ, който може да бъде разглеждан по няколко начина: като автор, като издател или като зрител. SGML, XML и HTML са примери за структурирани документи. XML се използва в този урок, за да демонстрира функцията Structured FrameMaker.
Структурираните документи, като XML файлове, се създават с помощта на елементи. Когато се работи с XML файлове, дефинициите на елементите и структурната информация се съхраняват в Document Type Definition (DTD). Когато се работи със структуриран документ във FrameMaker, дефинициите на елементите и структурната информация се съхраняват в Element Definitions Document (EDD). EDD също съдържа информация за форматиране и стилове. Когато създавате структуриран документ във FrameMaker, трябва да свържете EDD с документа.
Промяна на продуктовия интерфейс
Преди да започнете да работите със структурирани документи, трябва да промените интерфейса на Structured FrameMaker.
За да промените интерфейса:
Създаване на структуриран документ, използвайки стандартен шаблон
Не можете да създадете нов структуриран документ във FrameMaker, без първо да създадете EDD. EDD обикновено се създават от разработчик на приложение и са извън обхвата на този урок.
За да създадете структуриран документ, използвайки шаблон:
Отваряне на Structure View
Structure View предоставя йерархично представяне на структурата на документа и показва връзката на елементите, които в момента се използват в документа.
За да отворите диалоговия прозорец Structure View, кликнете върху
разположен от дясната страна на прозореца на документа.
Появява се диалоговият прозорец Structure View.
Отваряне на Element Catalog
Element Catalog предоставя списък на всички елементи, достъпни за използване в структурирания документ.
За да отворите Element Catalog и да покажете всички елементи:
разположен от дясната страна на прозореца на документа.
Показване на границите на елементи като тагове
За да покажете таговете на елементите:
Вмъкване на елементи и атрибути
Когато поставите курсора си в таговете на структуриран документ, списъкът на валидните елементи се променя. Тези елементи се показват с отметка в Element Catalog. Ако вмъкнете елемент, който не е валиден, вашият документ вече не е структуриран.
За да вмъкнете елементи:
Валидиране на структуриран документ
За да проверите структурата на вашия документ, трябва да го валидирате. Валидирането на вашия документ гарантира, че всички ограничения, дефинирани за вашия документ, са спазени. Документът не е структуриран, ако не премине валидацията.
За да валидирате структуриран документ:
Запазване на структуриран документ като XML файл
Най-добрият начин да запазите структуриран документ като XML файл, използвайки FrameMaker, е да експортирате файла в WebWorks Publisher Standard Edition. Това приложение се доставя с FrameMaker, но се инсталира отделно. Трябва да имате инсталиран WebWorks Publisher, за да завършите тази процедура.
За да запазите структуриран документ като XML файл, използвайки WebWorks Publisher Standard Edition:
This paper is based on the platform Windows 2000/Windows XP, which supports the standard MS virtual font substitution mechanism for Non-Unicode applications. That means, the operating system supports automatically the display of a certain part of a big font, like "Arial CE", via enabling a specific country setting.
Using languages within FrameMaker
Adobe does not support FrameMaker for easter- and southern-european languages. Nevertheless it is possible to use for example a Greek font, but with restrictions:
The following characters are not usable within FrameMaker or are displayed the wrong way (font-depending): CE - Ź and ť
The following characters are not usable within FrameMaker (language-depending):
Using languages for creating PDF documents
Result:
Problems coming up in bookmarks
With the default settings of FrameMaker 2 problems arise in the PDF file:
Implementing structured Adobe® FrameMaker® is both an opportunity and a challenge.
You can combine FrameMaker's powerful features with structured authoring to create a sophisticated workflow. Within this new authoring environment, you can automate formatting, create, edit, and publish XML-based content, and enforce required document structures.
The challenge is that building a structured workflow requires you to master new tools (such as the structure features in FrameMaker), new concepts (structured authoring), and new technology (XML, structure definitions, and perhaps Extensible Stylesheet Language (XSL) transformation). If you have no immediate need for XML, you can implement structure in FrameMaker without providing support for XML import or export.
Внедряването на структурирания Adobe® FrameMaker® е както възможност, така и предизвикателство.
Можете да комбинирате мощните функции на FrameMaker със структурираното създаване на съдържание, за да създадете сложен работен процес. В тази нова среда за създаване на съдържание можете да автоматизирате форматирането, да създавате, редактирате и публикувате базирано на XML съдържание, и да налагате задължителни структури на документите.
Предизвикателството е, че изграждането на структуриран работен процес изисква да овладеете нови инструменти (като структурните функции във FrameMaker), нови концепции (структурирано създаване на съдържание) и нова технология (XML, дефиниции на структура и евентуално Extensible Stylesheet Language (XSL) трансформация). Ако нямате непосредствена нужда от XML, можете да внедрите структура във FrameMaker, без да осигурите поддръжка за XML импорт или експорт.
Този документ се основава на платформата Windows 2000/Windows XP, която поддържа стандартния MS механизъм за виртуално заместване на шрифтове за Non-Unicode приложения. Това означава, че операционната система поддържа автоматично показването на определена част от голям шрифт, като „Arial CE“, чрез активиране на специфична настройка за държавата.
Използване на езици във FrameMaker
Adobe не поддържа FrameMaker за източно- и южноевропейски езици. Въпреки това е възможно да се използва например гръцки шрифт, но с ограничения:
Следните знаци не могат да бъдат използвани във FrameMaker или се показват по грешен начин (в зависимост от шрифта): CE - Ź и ť
Следните знаци не могат да бъдат използвани във FrameMaker (в зависимост от езика):
Използване на езици за създаване на PDF документи
Резултат:
Проблеми, появяващи се в отметките
С настройките по подразбиране на FrameMaker възникват 2 проблема в PDF файла:
About the script: Here is a simple script that proportionately scales a table to fit the text column that contains it. This script works with the current table but can be easily expanded to work with all of the tables in a document or book.
Getting the data: Click your cursor in a table that needs to be scaled. You will need to collect some basic information in order to scale the table correctly. Here is commented code to set the needed data into variables.
// The selected table.
Set vTbl = SelectedTbl;
// The current width of the table.
Set vTblWidth = vTbl.TblWidth;
// The width of the column containing the table.
Set vColWidth = vTbl.TextLoc.Object.InTextObj.Width;
The vColWidth variable is the width of the column in a multi-column text frame. If the text frame only has one column, the column width is equal to the text frame width. If you have multiple columns, but want to scale the table to the width of the text frame, use the following lines in place of the last two lines above.
// The width of the text frame containing the table.
Set vColWidth = vTbl.TextLoc.Object.InTextFrame.Width;
Now, the script can do some math to figure out much to scale the table.
// Divide the column width by the table width.
Set vScaleFactor = vColWidth / vTblWidth;
How to scale the table?
The table's TblWidth property is read only, so you cannot use this to scale the table.
// This won't work.
Set vTbl.TblWidth = vTblWidth * vScaleFactor;
Instead, you have to change the width of each individual column of the table. These widths are stored in a MetricList called TblColWidths.
// Set a variable for the table column widths.
Set vWidths = vTbl.TblColWidths;
A metric list is a list of measurement values. In this case, there is a member of the list for each column in the table. If the table has five columns, the TblColWidth list will contain five members.
The key to the script is to loop through the list of measurements, multiply each one by vScaleFactor and put the new value back in the list.
// Loop through the list and calculate each
// table column's new width.
Loop While(vCounter <= vWidths.Count) LoopVar(vCounter)
Init(1) Incr(1)
Get Member Number(vCounter) From(vWidths) NewVar(vWidth);
Set vNewWidth = vWidth * vScaleFactor;
Replace Member Number(vCounter) In(vWidths) With(vNewWidth);
EndLoop
The vCounter variable will increment by 1 (Incr(1)) starting at 1 (Init(1)) through the number of members in vWidths (vWidths.Count). Each member will be multiplied by the scale factor, and the member will be replaced with the new value.
Your vWidths MetricList variable now contains the correct widths to scale the table to the column width. The only thing left to do is assign the new values to the table.
Set vTbl.TblColWidths = vWidths;
За скрипта: Ето един прост скрипт, който пропорционално мащабира таблица, за да съответства на текстовата колона, която я съдържа. Този скрипт работи с текущата таблица, но може лесно да бъде разширен, за да работи с всички таблици в документ или книга.
Получаване на данните: Кликнете с курсора в таблица, която трябва да бъде мащабирана. Ще трябва да съберете някаква основна информация, за да мащабирате таблицата правилно. Ето коментиран код за задаване на необходимите данни в променливи.
// The selected table.
Set vTbl = SelectedTbl;
// The current width of the table.
Set vTblWidth = vTbl.TblWidth;
// The width of the column containing the table.
Set vColWidth = vTbl.TextLoc.Object.InTextObj.Width;
Променливата vColWidth е ширината на колоната в многоколонна текстова рамка. Ако текстовата рамка има само една колона, ширината на колоната е равна на ширината на текстовата рамка. Ако имате множество колони, но искате да мащабирате таблицата до ширината на текстовата рамка, използвайте следните редове на мястото на последните два реда по-горе.
// The width of the text frame containing the table.
Set vColWidth = vTbl.TextLoc.Object.InTextFrame.Width;
Сега скриптът може да направи малко математика, за да определи колко да мащабира таблицата.
// Divide the column width by the table width.
Set vScaleFactor = vColWidth / vTblWidth;
Как да мащабирате таблицата?
Свойството TblWidth на таблицата е само за четене, така че не можете да го използвате за мащабиране на таблицата.
// This won't work.
Set vTbl.TblWidth = vTblWidth * vScaleFactor;
Вместо това трябва да промените ширината на всяка отделна колона на таблицата. Тези ширини се съхраняват в MetricList, наречен TblColWidths.
// Set a variable for the table column widths.
Set vWidths = vTbl.TblColWidths;
Metric list е списък със стойности за измерване. В този случай има член от списъка за всяка колона в таблицата. Ако таблицата има пет колони, списъкът TblColWidth ще съдържа пет члена.
Ключът към скрипта е да се премине през списъка с измервания, да се умножи всяко от тях с vScaleFactor и новата стойност да се постави обратно в списъка.
// Loop through the list and calculate each
// table column's new width.
Loop While(vCounter <= vWidths.Count) LoopVar(vCounter)
Init(1) Incr(1)
Get Member Number(vCounter) From(vWidths) NewVar(vWidth);
Set vNewWidth = vWidth * vScaleFactor;
Replace Member Number(vCounter) In(vWidths) With(vNewWidth);
EndLoop
Променливата vCounter ще се увеличава с 1 (Incr(1)), започвайки от 1 (Init(1)), през броя на членовете в vWidths (vWidths.Count). Всеки член ще бъде умножен с фактора за мащабиране и членът ще бъде заменен с новата стойност.
Вашата MetricList променлива vWidths сега съдържа правилните ширини за мащабиране на таблицата до ширината на колоната. Единственото останало нещо е да присвоите новите стойности на таблицата.
Set vTbl.TblColWidths = vWidths;
There are two types of cross-references in FrameMaker: spot cross-references and paragraph cross-references. (There is a third type, element cross-references, available only in FrameMaker+SGML. This tutorial will not discuss element cross-references). Both paragraph and spot cross-references are similar, in that you have to insert an Xref object that points to a Cross-Ref Marker. The Xref object has an XRefSrcText property that must exactly match the marker text of the Cross-Ref Marker. Let's start with spot cross-references, since they are a little simpler to work with.
Spot cross-references
As an example, here is a table that contains the names of maintenance procedures that occur in a document. We want to use FrameScript to make cross-references from the entries in the table to the actual procedures in the document. Each procedure title uses a Heading2 paragraph format.
Adding cross reference markers
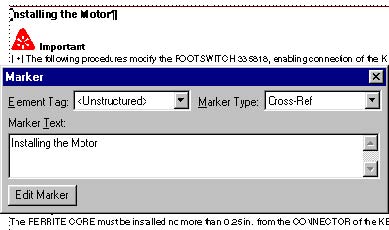
One principle we like to add here when solving problems with FrameScript, is to break down the problem into small tasks. Our first task is to put cross-reference markers in each procedure heading paragraph. Since we know that procedures start with Heading2 paragraphs, we will only put markers in those paragraphs. The marker text will be set to the text of the paragraph. It is important that each cross-reference marker in the document contains unique text. We will assume in our example that each Heading2 paragraph contains text that is unique from all other Heading2 paragraphs in the document.
// Test for an active document.
If ActiveDoc = 0
MsgBox 'No active document. ';
LeaveSub;
Else
Set vCurrentDoc = ActiveDoc;
EndIf
Loop ForEach(Pgf) In(vCurrentDoc) LoopVar(vPgf)
If vPgf.Name = 'Heading2'
New Marker NewVar(vMarker) MarkerName('Cross-Ref')
TextLoc(vPgf);
// Set the marker text to the paragraph text.
Set vMarker.MarkerText = vPgf.Text;
EndIf
EndLoop
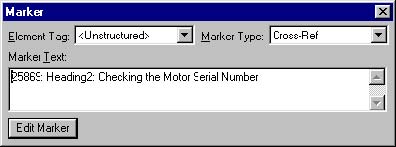
Each Heading2 paragraph will have a cross-reference marker at the beginning of it with the text of the paragraph as the marker text. Here is one of the Heading2 paragraphs with the marker window showing the marker text.
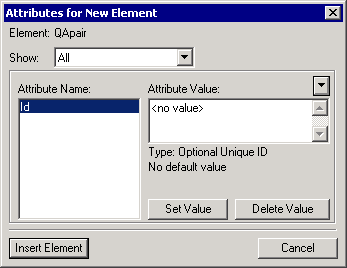
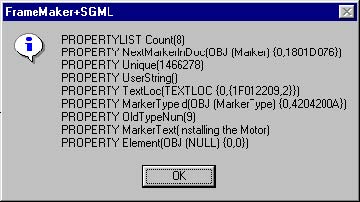
Because we are creating markers with FrameScript instead of the FrameMaker interface, let's take a look at the marker properties. You can run the following code with the marker anchor selected to see the marker's properties. Notice that the MarkerText property is the text that shows in the Marker dialog.
Get TextList InRange(TextSelection) MarkerAnchor
NewVar(vTextList);
If vTextList.Count > 0
Get Member Number(1) From(vTextList) NewVar(vMarker);
Set vMarker = vMarker.TextData;
Display vMarker.Properties;
Else
MsgBox 'There is no marker selected. ';
EndIf
Adding the cross-references
Now we can go to the table and have a script add cross-references to the markers ("spots") we inserted earlier. We will assume that the cursor is in the table when the following code is run.
// Test for an active document.
If ActiveDoc = 0
MsgBox 'There is no active document. ';
LeaveSub;
Else
Set vCurrentDoc = ActiveDoc;
EndIf
// Set a variable for the current table.
Set vTbl = vCurrentDoc.SelectedTbl;
// Make sure a the cursor is in a table.
If vTbl.ObjectName not= 'Tbl'
MsgBox 'There is no selected table. ';
LeaveSub; // Exit the script.
EndIf
// Find the first body row in the table.
Set vRow = vTbl.FirstRowInTbl;
Loop While(vRow.RowType = RowHeading)
Set vRow = vRow.NextRowInTbl;
EndLoop
// Go to the first cell in the first body row.
Set vCell = vRow.FirstCellInRow;
Now that we are in the first cell, we can begin a loop down through the cells. For each cell, we need to "select" the text so that the new cross-reference can replace it. The XRefSrcText property of the XRef (cross-reference) will be set to the selected text since this will match the marker text of the corresponding cross-reference marker that was inserted earlier. To select the text, we will make a text range, delete the text, and then insert the XRef object in its place.
// Begin the loop.
Loop While(vCell)
// Select the text by making a TextRange.
New TextRange NewVar(vTextRange) Object(vCell.FirstPgf)
Offset(0) Offset(ObjEndOffset-1);
// Set a variable for the TextRange text.
Set vXRefSrcText = vTextRange.Text;
// Delete the text.
Delete Text TextRange(vTextRange);
// Insert the cross-reference.
New XRef Format('Heading & Page') TextLoc(vCell.FirstPgf)
NewVar(vXRef);
Set vXRef.XRefSrcText = vXRefSrcText;
// Go to the next cell and repeat the loop.
Set vCell = vCell.CellBelowInCol;
EndLoop
// Update the cross-references.
Update DocObject(vCurrentDoc) XRefs Everything;
The table now shows the original text replaced with the cross-references. If you double-click on one of the cross-references, it will open the Cross-Reference dialog box as shown below.
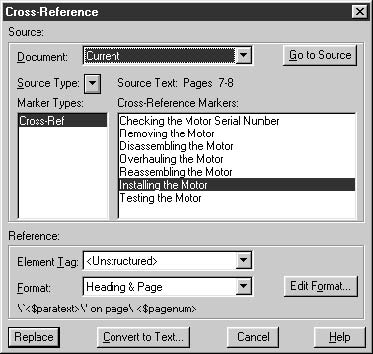
The key thing to remember is that the XRef.XRefSrcText property must exactly match the XRef.MarkerText property of the corresponding marker otherwise, you will have an unresolved cross-reference. To see the cross-reference properties, highlight one of the cross-references and run the following code. Notice the XRefSrcText property.
Get TextList InRange(TextSelection) XRefBegin
NewVar(vTextList);
If vTextList.Count > 0
Get Member Number(1) From(vTextList) NewVar(XRefBegin);
Set XRefBegin = XRefBegin.TextData;
Display XRefBegin.Properties;
Else
MsgBox 'There is no cross-reference selected. ';
EndIf
Cross-references to other documents
One other important property to note is the XRefFile property. For the above cross-reference it is a NULL string because it is an internal cross-reference. If we were cross-referencing another file, then the XRefFile property would contain the absolute path to the other file.
Paragraph cross-references
Before discussing the insertion of paragraph cross-references with FrameScript, let's review how they differ from spot cross-references in the FrameMaker interface. When you insert a spot cross-reference with FrameMaker, you have to insert a cross-reference marker before you insert the cross-reference. You have to make a "spot" that will appear in the Cross-Reference dialog box.
In contrast, paragraph cross-references don’t require the insertion of a cross-reference marker ahead of time. Instead, you point to the desired paragraph in the Cross-Reference dialog box, click Insert, and FrameMaker inserts the cross-reference and the cross-reference marker in the appropriate places.
Once inserted, spot and paragraph cross-references don't differ in their basic underlying properties. All cross-references are accessed as XRef objects by FrameScript. There is a difference, however, in the way they are presented in the FrameMaker Cross-Reference dialog box. When you double-click on a spot cross-reference, the dialog shows Cross-Ref markers under the Source Type and marker text in the right-hand list. Double-clicking a paragraph cross-reference shows the Paragraph Tag of the source paragraph under Source Type and the paragraph text each of the selected Paragraph Tag paragraphs in the right-hand list. Below is the Cross-Reference dialog box showing a paragraph cross-reference.
The difference between the cross-reference types comes from a difference in the syntax of the cross-reference markers. To see this, insert a paragraph cross-reference, Control-Alt-Click on the cross-reference to go to the source, and open the marker window. You will see the syntax of the marker that FrameMaker inserts with a paragraph cross-reference. Below is a sample marker window followed by the XRef properties.
Like the spot cross-reference markers we inserted earlier, you can see the text of the source paragraph in the marker window and the XRefSrcText property. In addition, the paragraph text is preceded by a five-digit number (followed by a colon and space), and the name of the paragraph format of the source paragraph (followed by a colonm and space). It is these two additional components in the XRefSrcText property of the XRef that causes FrameMaker to "see" this as a paragraph cross-reference.
Keeping cross-ref markers unique
There is another reason for the different syntax between paragraph and spot cross-references. It is essential that Cross-Ref markers within a document are unique. While you can have more than one cross-reference pointing to a single Cross-Ref marker, you can't have a single cross-reference trying to point to more than one marker with the same marker text. When you insert spot cross-references, it is up to you to make sure that each Cross-Ref marker is unique. When you insert paragraph cross-references, FrameMaker makes sure the markers it inserts are unique by using the special syntax, particularly the five-digit serial number on the front.
The cross-ref marker text should never be changed after the markers are inserted. You could have several cross-references pointing to the same marker; if you change the marker text, the cross-references would become unresolved. Likewise, changing the text of the source paragraph will not change the marker text.
Before writing some code to insert paragraph cross-references, here are the important points to remember about both paragraph and spot cross-references.
Adding paragraph cross-references
We will use the same example we used with spot cross-references, except this time we will insert the cross-references and its corresponding marker at the same time. In our previous example, we inserted all of the markers first and then the cross-references. We assumed that for every entry in the table, there would be an exactly matching Heading2 paragraph in the document. This might not always be a safe assumption and could result in unresolved cross-references.
We will start with our loop through the table. The entire code listing is below.
// Test for an active document.
If ActiveDoc = 0
MsgBox 'There is no active document. ';
LeaveSub;
Else
Set vCurrentDoc = ActiveDoc;
EndIf
// Set a variable for the current table.
Set vTbl = vCurrentDoc.SelectedTbl;
// Make sure a the cursor is in a table.
If vTbl.ObjectName not= 'Tbl'
MsgBox 'There is no selected table. ';
LeaveSub; // Exit the script.
EndIf
// Make a property list for the color red.
Get Object Type(Color) Name('Red') DocObject(vCurrentDoc)
NewVar(vColor);
New PropertyList NewVar(vProps) Color(vColor);
// Find the first body row in the table.
Set vRow = vTbl.FirstRowInTbl;
Loop While(vRow.RowType = RowHeading)
Set vRow = vRow.NextRowInTbl;
EndLoop
// Go to the first cell in the first body row.
Set vCell = vRow.FirstCellInRow;
// Begin the loop.
Loop While(vCell)
// Select the text by making a TextRange.
New TextRange NewVar(vTextRange) Object(vCell.FirstPgf)
Offset(0) Offset(ObjEndOffset-1);
// Set a variable for the TextRange text.
Set vXRefSrcText = vTextRange.Text;
// Run a subroutine to find the corresponding
heading.
Set vHeadingFound = 0;
Run FindSourceHeading Returns vMarkerText(vXRefSrcText);
If vHeadingFound = 1
// Delete the text.
Delete Text TextRange(vTextRange);
// Insert the cross-reference.
New XRef Format('Heading & Page') TextLoc(vCell.FirstPgf)
NewVar(vXRef);
Set vXRef.XRefSrcText = vXRefSrcText;
Else
// If the corresponding heading can’t be found, color the
// text red so it stands out.
Apply TextProperties TextRange(vTextRange)
Properties(vProps);
EndIf
// Go to the next cell and repeat the loop.
Set vCell = vCell.CellBelowInCol;
EndLoop
// Update the cross-references.
Update DocObject(vCurrentDoc) XRefs Everything;
For each entry in the table, we are going to run a subroutine called FindSourceHeading that attempts to locate the corresponding heading in the document. If it doesn't find a corresponding head with the same text, it will apply the color red to the text in the table cell so you can easily know that there is a problem. Here is the code listing for the subroutine.
Sub FindSourceHeading
//
Loop ForEach(Pgf) In(vCurrentDoc) LoopVar(vPgf)
If vPgf.Name = 'Heading2'
// See if the paragraph text is the same as the table
// cell text.
If vPgf.Text = vXRefSrcText
// Make marker text with paragraph cross-ref syntax.
// Get the unique Id of the paragraph and convert it to
// a string.
New String NewVar(vMarkerText) Value(vPgf.Unique);
// Drop the first character so we end up with 5 digits.
Get String FromString(vMarkerText) NewVar(vMarkerText)
StartPos(vMarkerText.Size - 4);
// Add the paragraph tag and text.
Set vMarkerText = vMarkerText + ': ' + vPgf.Name + ': ' +
vPgf.Text;
// Add the cross-reference marker.
New Marker NewVar(vMarker) MarkerName('Cross-Ref')
TextLoc(vPgf);
// Set the marker text to the paragraph text.
Set vMarker.MarkerText = vMarkerText;
// Set the vHeadingFound variable to 1.
Set vHeadingFound = 1;
// Leave the subroutine.
LeaveSub;
EndIf
EndIf
EndLoop
//
EndSub
Notice that this code is similar to the earlier script that inserted the spot cross reference markers. It is a simple loop through the document's paragraphs looking for Heading2 paragraphs. It has an addition test to see if the paragraph's text matches the text of the table cell.
Има два вида кръстосани препратки във FrameMaker: точкови кръстосани препратки и параграфни кръстосани препратки. (Има и трети вид, елементни кръстосани препратки, достъпни само във FrameMaker+SGML. Този урок няма да обсъжда елементните кръстосани препратки.) И параграфните, и точковите кръстосани препратки са подобни по това, че трябва да вмъкнете Xref обект, който сочи към Cross-Ref Marker. Xref обектът има свойство XRefSrcText, което трябва да съответства точно на текста на маркера на Cross-Ref Marker. Нека започнем с точковите кръстосани препратки, тъй като те са малко по-прости за работа.
Точкови кръстосани препратки
Като пример, ето една таблица, която съдържа имената на процедурите за поддръжка, появяващи се в документ. Искаме да използваме FrameScript, за да направим кръстосани препратки от записите в таблицата към действителните процедури в документа. Всяко заглавие на процедура използва формат на параграф Heading2.
Добавяне на маркери за кръстосани препратки
Един принцип, който ни се иска да добавим тук при решаване на проблеми с FrameScript, е да разбиваме проблема на малки задачи. Нашата първа задача е да поставим маркери за кръстосани препратки във всеки заглавен параграф на процедура. Тъй като знаем, че процедурите започват с параграфи Heading2, ще поставим маркери само в тези параграфи. Текстът на маркера ще бъде настроен на текста на параграфа. Важно е всеки маркер за кръстосана препратка в документа да съдържа уникален текст. Ще приемем в нашия пример, че всеки параграф Heading2 съдържа текст, уникален за всички други параграфи Heading2 в документа.
// Test for an active document.
If ActiveDoc = 0
MsgBox 'No active document. ';
LeaveSub;
Else
Set vCurrentDoc = ActiveDoc;
EndIf
Loop ForEach(Pgf) In(vCurrentDoc) LoopVar(vPgf)
If vPgf.Name = 'Heading2'
New Marker NewVar(vMarker) MarkerName('Cross-Ref')
TextLoc(vPgf);
// Set the marker text to the paragraph text.
Set vMarker.MarkerText = vPgf.Text;
EndIf
EndLoop
Всеки параграф Heading2 ще има маркер за кръстосана препратка в началото си с текста на параграфа като текст на маркера. Ето един от параграфите Heading2 с прозореца на маркера, показващ текста на маркера.
Тъй като създаваме маркери с FrameScript, вместо чрез интерфейса на FrameMaker, нека погледнем свойствата на маркера. Можете да изпълните следния код с избран маркер anchor, за да видите свойствата на маркера. Обърнете внимание, че свойството MarkerText е текстът, който се показва в диалоговия прозорец Marker.
Get TextList InRange(TextSelection) MarkerAnchor
NewVar(vTextList);
If vTextList.Count > 0
Get Member Number(1) From(vTextList) NewVar(vMarker);
Set vMarker = vMarker.TextData;
Display vMarker.Properties;
Else
MsgBox 'There is no marker selected. ';
EndIf
Добавяне на кръстосаните препратки
Сега можем да отидем в таблицата и да имаме скрипт, който добавя кръстосани препратки към маркерите („spots“), които вмъкнахме по-рано. Ще приемем, че курсорът е в таблицата, когато се изпълнява следният код.
// Test for an active document.
If ActiveDoc = 0
MsgBox 'There is no active document. ';
LeaveSub;
Else
Set vCurrentDoc = ActiveDoc;
EndIf
// Set a variable for the current table.
Set vTbl = vCurrentDoc.SelectedTbl;
// Make sure a the cursor is in a table.
If vTbl.ObjectName not= 'Tbl'
MsgBox 'There is no selected table. ';
LeaveSub; // Exit the script.
EndIf
// Find the first body row in the table.
Set vRow = vTbl.FirstRowInTbl;
Loop While(vRow.RowType = RowHeading)
Set vRow = vRow.NextRowInTbl;
EndLoop
// Go to the first cell in the first body row.
Set vCell = vRow.FirstCellInRow;
Сега, когато сме в първата клетка, можем да започнем цикъл през клетките. За всяка клетка трябва да „изберем“ текста, така че новата кръстосана препратка да може да го замени. Свойството XRefSrcText на XRef (кръстосана препратка) ще бъде настроено на избрания текст, тъй като това ще съответства на текста на маркера на съответния маркер за кръстосана препратка, който е вмъкнат по-рано. За да изберем текста, ще направим текстов обхват, ще изтрием текста и след това ще вмъкнем XRef обекта на негово място.
// Begin the loop.
Loop While(vCell)
// Select the text by making a TextRange.
New TextRange NewVar(vTextRange) Object(vCell.FirstPgf)
Offset(0) Offset(ObjEndOffset-1);
// Set a variable for the TextRange text.
Set vXRefSrcText = vTextRange.Text;
// Delete the text.
Delete Text TextRange(vTextRange);
// Insert the cross-reference.
New XRef Format('Heading & Page') TextLoc(vCell.FirstPgf)
NewVar(vXRef);
Set vXRef.XRefSrcText = vXRefSrcText;
// Go to the next cell and repeat the loop.
Set vCell = vCell.CellBelowInCol;
EndLoop
// Update the cross-references.
Update DocObject(vCurrentDoc) XRefs Everything;
Таблицата сега показва оригиналния текст, заменен с кръстосаните препратки. Ако кликнете два пъти върху една от кръстосаните препратки, ще се отвори диалоговият прозорец Cross-Reference, както е показано по-долу.
Основното, което трябва да запомните, е, че свойството XRef.XRefSrcText трябва да съответства точно на свойството XRef.MarkerText на съответния маркер, в противен случай ще имате неразрешена кръстосана препратка. За да видите свойствата на кръстосаната препратка, маркирайте една от кръстосаните препратки и изпълнете следния код. Обърнете внимание на свойството XRefSrcText.
Get TextList InRange(TextSelection) XRefBegin
NewVar(vTextList);
If vTextList.Count > 0
Get Member Number(1) From(vTextList) NewVar(XRefBegin);
Set XRefBegin = XRefBegin.TextData;
Display XRefBegin.Properties;
Else
MsgBox 'There is no cross-reference selected. ';
EndIf
Кръстосани препратки към други документи
Едно друго важно свойство, което трябва да се отбележи, е свойството XRefFile. За горната кръстосана препратка то е NULL низ, тъй като е вътрешна кръстосана препратка. Ако препращахме към друг файл, тогава свойството XRefFile ще съдържа абсолютния път до другия файл.
Параграфни кръстосани препратки
Преди да обсъдим вмъкването на параграфни кръстосани препратки с FrameScript, нека прегледаме как те се различават от точковите кръстосани препратки в интерфейса на FrameMaker. Когато вмъквате точкова кръстосана препратка с FrameMaker, трябва да вмъкнете маркер за кръстосана препратка, преди да вмъкнете кръстосаната препратка. Трябва да направите „точка“, която ще се появи в диалоговия прозорец Cross-Reference.
За разлика от това, параграфните кръстосани препратки не изискват вмъкване на маркер за кръстосана препратка предварително. Вместо това посочвате желания параграф в диалоговия прозорец Cross-Reference, кликвате върху Insert и FrameMaker вмъква кръстосаната препратка и маркера за кръстосана препратка на подходящите места.
След като бъдат вмъкнати, точковите и параграфните кръстосани препратки не се различават в основните си свойства. Всички кръстосани препратки се достъпват като XRef обекти от FrameScript. Има разлика обаче в начина, по който те се представят в диалоговия прозорец Cross-Reference на FrameMaker. Когато кликнете два пъти върху точкова кръстосана препратка, диалогът показва Cross-Ref маркери под Source Type и текста на маркера в дясно разположения списък. Двойно кликване върху параграфна кръстосана препратка показва Paragraph Tag на изходния параграф под Source Type и текста на параграфа за всеки от избраните Paragraph Tag параграфи в дясно разположения списък. По-долу е диалоговият прозорец Cross-Reference, показващ параграфна кръстосана препратка.
Разликата между типовете кръстосани препратки идва от разликата в синтаксиса на маркерите за кръстосани препратки. За да видите това, вмъкнете параграфна кръстосана препратка, Control-Alt-Click върху кръстосаната препратка, за да отидете до източника, и отворете прозореца на маркера. Ще видите синтаксиса на маркера, който FrameMaker вмъква с параграфна кръстосана препратка. По-долу е примерен прозорец на маркер, последван от свойствата на XRef.
Подобно на маркерите за точкови кръстосани препратки, които вмъкнахме по-рано, можете да видите текста на изходния параграф в прозореца на маркера и свойството XRefSrcText. Освен това текстът на параграфа се предшества от петцифрен номер (последван от двоеточие и интервал) и името на формата на параграф на изходния параграф (последвано от двоеточие и интервал). Именно тези два допълнителни компонента в свойството XRefSrcText на XRef карат FrameMaker да „вижда“ това като параграфна кръстосана препратка.
Поддържане на cross-ref маркерите уникални
Има и друга причина за различния синтаксис между параграфните и точковите кръстосани препратки. От съществено значение е Cross-Ref маркерите в документ да са уникални. Въпреки че можете да имате повече от една кръстосана препратка, сочеща към един Cross-Ref маркер, не можете да имате единична кръстосана препратка, опитваща се да сочи към повече от един маркер със същия текст на маркера. Когато вмъквате точкови кръстосани препратки, от вас зависи да се уверите, че всеки Cross-Ref маркер е уникален. Когато вмъквате параграфни кръстосани препратки, FrameMaker се грижи маркерите, които вмъква, да са уникални, използвайки специалния синтаксис, по-специално петцифрения сериен номер отпред.
Текстът на cross-ref маркерите никога не трябва да се променя след вмъкването на маркерите. Може да имате няколко кръстосани препратки, сочещи към един и същи маркер; ако промените текста на маркера, кръстосаните препратки ще станат неразрешени. По подобен начин, промяната на текста на изходния параграф няма да промени текста на маркера.
Преди да напишем някакъв код за вмъкване на параграфни кръстосани препратки, ето важните моменти, които трябва да запомните за параграфните и точковите кръстосани препратки.
Добавяне на параграфни кръстосани препратки
Ще използваме същия пример, който използвахме с точковите кръстосани препратки, освен че този път ще вмъкнем кръстосаните препратки и съответстващия им маркер едновременно. В предишния ни пример първо вмъкнахме всички маркери и след това кръстосаните препратки. Предположихме, че за всеки запис в таблицата ще има точно съответстващ параграф Heading2 в документа. Това не винаги може да е безопасно предположение и може да доведе до неразрешени кръстосани препратки.
Ще започнем с нашия цикъл през таблицата. Целият списък с код е по-долу.
// Test for an active document.
If ActiveDoc = 0
MsgBox 'There is no active document. ';
LeaveSub;
Else
Set vCurrentDoc = ActiveDoc;
EndIf
// Set a variable for the current table.
Set vTbl = vCurrentDoc.SelectedTbl;
// Make sure a the cursor is in a table.
If vTbl.ObjectName not= 'Tbl'
MsgBox 'There is no selected table. ';
LeaveSub; // Exit the script.
EndIf
// Make a property list for the color red.
Get Object Type(Color) Name('Red') DocObject(vCurrentDoc)
NewVar(vColor);
New PropertyList NewVar(vProps) Color(vColor);
// Find the first body row in the table.
Set vRow = vTbl.FirstRowInTbl;
Loop While(vRow.RowType = RowHeading)
Set vRow = vRow.NextRowInTbl;
EndLoop
// Go to the first cell in the first body row.
Set vCell = vRow.FirstCellInRow;
// Begin the loop.
Loop While(vCell)
// Select the text by making a TextRange.
New TextRange NewVar(vTextRange) Object(vCell.FirstPgf)
Offset(0) Offset(ObjEndOffset-1);
// Set a variable for the TextRange text.
Set vXRefSrcText = vTextRange.Text;
// Run a subroutine to find the corresponding
heading.
Set vHeadingFound = 0;
Run FindSourceHeading Returns vMarkerText(vXRefSrcText);
If vHeadingFound = 1
// Delete the text.
Delete Text TextRange(vTextRange);
// Insert the cross-reference.
New XRef Format('Heading & Page') TextLoc(vCell.FirstPgf)
NewVar(vXRef);
Set vXRef.XRefSrcText = vXRefSrcText;
Else
// If the corresponding heading can't be found, color the
// text red so it stands out.
Apply TextProperties TextRange(vTextRange)
Properties(vProps);
EndIf
// Go to the next cell and repeat the loop.
Set vCell = vCell.CellBelowInCol;
EndLoop
// Update the cross-references.
Update DocObject(vCurrentDoc) XRefs Everything;
За всеки запис в таблицата ще изпълним подпрограма, наречена FindSourceHeading, която се опитва да намери съответстващото заглавие в документа. Ако не намери съответстващо заглавие със същия текст, тя ще приложи цвета червен към текста в клетката на таблицата, така че лесно да можете да знаете, че има проблем. Ето списъка с код за подпрограмата.
Sub FindSourceHeading
//
Loop ForEach(Pgf) In(vCurrentDoc) LoopVar(vPgf)
If vPgf.Name = 'Heading2'
// See if the paragraph text is the same as the table
// cell text.
If vPgf.Text = vXRefSrcText
// Make marker text with paragraph cross-ref syntax.
// Get the unique Id of the paragraph and convert it to
// a string.
New String NewVar(vMarkerText) Value(vPgf.Unique);
// Drop the first character so we end up with 5 digits.
Get String FromString(vMarkerText) NewVar(vMarkerText)
StartPos(vMarkerText.Size - 4);
// Add the paragraph tag and text.
Set vMarkerText = vMarkerText + ': ' + vPgf.Name + ': ' +
vPgf.Text;
// Add the cross-reference marker.
New Marker NewVar(vMarker) MarkerName('Cross-Ref')
TextLoc(vPgf);
// Set the marker text to the paragraph text.
Set vMarker.MarkerText = vMarkerText;
// Set the vHeadingFound variable to 1.
Set vHeadingFound = 1;
// Leave the subroutine.
LeaveSub;
EndIf
EndIf
EndLoop
//
EndSub
Обърнете внимание, че този код е подобен на по-ранния скрипт, който вмъкваше маркерите за точкови кръстосани препратки. Това е прост цикъл през параграфите на документа, търсещ параграфи Heading2. Той има допълнителен тест, за да види дали текстът на параграфа съответства на текста на клетката на таблицата.
If you can create a PDF file from another application using Acrobat Distiller, there may be a problem with FrameMaker. Perform the tasks in this section to determine if FrameMaker causes the problem.
1. Set Adobe PDF or the Acrobat Distiller printer as the default printer. Then, try to create a PDF file in FrameMaker.
2. If you use Save As PDF to create PDF files, print to the Adobe PDF printer.
3. Deselect Generate Acrobat Data in the Print Document dialog box.
PDF features, such as bookmarks, hyperlinks, and tags, may cause problems with the creation of PDF files. Disable these features to determine if they cause the problem.
4. Try printing with a different job option.
To determine if corrupt job options are the cause, select a different job option when you print in FrameMaker. If you're able to create a PDF file using a different job option, troubleshoot the problem job option in Acrobat Distiller by changing each setting and printing until you find the setting that causes the problem.
To select a different job option in FrameMaker:
To troubleshoot job options in Acrobat Distiller:
-- Acrobat Distiller 6.0 and 7.0:
-- Acrobat Distiller 5.0:
5. Create a PDF file from a new FrameMaker file.
If the new file doesn't print, remove and reinstall FrameMaker and Distiller. If Acrobat is installed, remove and reinstall it by using the Add/Remove Programs Control Panel. For further assistance, contact Adobe Technical Support.
Ако можете да създадете PDF файл от друго приложение, използвайки Acrobat Distiller, може да има проблем с FrameMaker. Изпълнете задачите в тази секция, за да определите дали FrameMaker причинява проблема.
1. Настройте Adobe PDF или Acrobat Distiller принтера като принтер по подразбиране. След това се опитайте да създадете PDF файл във FrameMaker.
2. Ако използвате Save As PDF за създаване на PDF файлове, отпечатайте към Adobe PDF принтера.
3. Деактивирайте Generate Acrobat Data в диалоговия прозорец Print Document.
PDF функции, като отметки, хиперлинкове и тагове, могат да причинят проблеми при създаването на PDF файлове. Деактивирайте тези функции, за да определите дали те причиняват проблема.
4. Опитайте да печатате с различна опция за задача.
За да определите дали повредените опции за задачи са причина, изберете различна опция за задача, когато печатате във FrameMaker. Ако успеете да създадете PDF файл, използвайки различна опция за задача, отстранете проблема с опцията за задачата в Acrobat Distiller, като променяте всяка настройка и печатате, докато намерите настройката, която причинява проблема.
За да изберете различна опция за задача във FrameMaker:
За да отстраните проблеми с опциите за задачи в Acrobat Distiller:
-- Acrobat Distiller 6.0 и 7.0:
-- Acrobat Distiller 5.0:
5. Създайте PDF файл от нов FrameMaker файл.
Ако новият файл не се отпечатва, премахнете и преинсталирайте FrameMaker и Distiller. Ако Acrobat е инсталиран, премахнете го и го преинсталирайте, използвайки контролния панел Add/Remove Programs. За допълнителна помощ се свържете с техническата поддръжка на Adobe.
Japanese users as well as multinational business users can take full advantage of the sophisticated Japanese publishing features in Adobe® FrameMaker® 7.0 software. The ability to define "combined" fonts of western and Japanese characters in the same document, integrated Japanese menus and messages, and composition rules are just a few features in FrameMaker 7.0. Targeted for Japanese authors and workgroups who need to create business-critical documents-such as product documentation, engineering specifications, work instructions, catalogs, manuals, and policies and procedures-FrameMaker is both flexible and powerful.
FrameMaker users, such as multinational companies needing to exchange information with their business partners in Japan, do not have to purchase a special Japanese version of FrameMaker. Users can access the Japanese features of FrameMaker 7.0 with a familiar user interface as long as a Japanese operating system is installed. Documents created in these western operating system environments can be directly opened and edited in the Japanese environment, and then printed, distributed, and translated.
Japanese characters
Traditionally, Japanese is written vertically starting in the upper-right-hand corner. Japanese can also be written horizontally and from left to right. A growing number of publications follow the left-to-right, top-to bottom western style. This is particularly true for professional publications.
Japanese character systems
The Japanese script is a mixture of three different systems called kanji, hiragana, and katakana. Hiragana and katakana are known collectively as "kana".
Kanji, adopted from the Chinese, consists of the basic ideograms or characters, each representing one word. To date, there are more than 8000 kanji characters that constitute more than 300,000 words.
Hiragana characters are used for words of Japanese origin. Hiragana characters are often used for particles (such as to, at, and other prepositions) that designate subject or object and for endings or words spelled in kanji.
Katakana, a more squared-off character set, duplicates the same set of sounds that exist for hiragana, but katakana is often used for writing English and other foreign words and names-similar to a shorthand system.
Japanese text input
Front-end processor
The most widely used method for entering Japanese characters is via built-in or third-party software that allows text to be entered by typing the word phonetically at the keyboard (usually using Roman letters). The user then searches via the software for the proper kanji character because many characters have the same pronunciation.
This input software is called a front-end processor (FEP) or, sometimes, an input method editor (IME).
Japanese double-byte character sets
Because there are so many Japanese characters, it is impossible to represent them all with a single 7-bit or 8-bit data type. The Japan Industrial Standard (JIS) Committee (the Japanese equivalent of ANSI) has established a standard character set, known as JIS X208, that determines the characters to be defined and the code to be assigned to the characters. There are at least three distinct encodings for JIS X208:
JIS Operates in a 7-bit environment and supports single-byte ASCII as well as two-byte Japanese characters by using special character sequences that begin with the "escape" (ESC) character.
Shift-JIS Operates in an 8-bit environment and is the native Japanese encoding on Windows® and Mac OS platforms.
EUC (Extended Unix Code) Operates in an 8-bit environment and is widely used on UNIX® platforms.
Shift-JIS versus Unicode
Unicode is a fixed-width, 16-bit character set that covers most of the world's written languages that are in current or expected use in computers. Since type families are generally designed and limited to a particular writing system, a software program still needs type family, language, and formatting information. FrameMaker 7.0 uses Shift-JIS as its internal encoding system for Japanese so users can take advantage of large and growing font sets as well as the tools that extend and manipulate fonts.
Using FrameMaker 7.0 for Japanese publishing
FrameMaker 7.0 includes the ability to create Japanese language documents — all you need is a Japanese operating system to input and display Japanese text. In the Mac OS environment, users can add Japanese capabilities to a western operating system.
Japanese character support and fonts
FrameMaker 7.0 software supports the most popular Japanese text encodings (JIS, Shift-JIS, and EUC) so that workgroup users can exchange text files on various platforms with different formats. FrameMaker also supports Enhanced Type 1 fonts as well as TrueType fonts on Windows and Mac OS platforms.
Inline input
FrameMaker 7.0 supports in-line or on-the-spot input, which allows users to directly type Japanese characters in a WYSIWYG environment instead of creating text in a separate window and placing it on the page. Users can use any compatible FEP or IME of their choice.
Rubi
Rubi characters are very small characters that appear above other characters. Rubi characters annotate characters by indicating their pronunciation or by augmenting their meanings. FrameMaker 7.0 provides precise typographical control of rubi characters and supports in-line input which very few applications offer.
Combined fonts
It is common in technical documentation to mix Japanese and western characters in the same Japanese document. For example, western characters are used for product names, numbers, and the names of people.
FrameMaker 7.0 software allows users to create custom "combined" fonts. When a combined font is used, western characters are displayed using the western fonts, and Japanese characters are displayed using Japanese fonts. This allows users to include both Japanese and western fonts in a line of text, retaining a consistent look as well as the proper proportions for both fonts.
Line breaking and hyphenation (composition rules)
FrameMaker 7.0 complies with Japanese publishing standards by supporting Kumihan (Japanese composition) rules for line breaking and hyphenating text. FrameMaker also allows fine-grain customization of these rules to conform to corporate typographic standards.
Variables
FrameMaker 7.0 supports both Japanese and western country-specific notations of dates, including the use of native Japanese imperial and kanji dates and pages in documents.
Autonumbering
FrameMaker 7.0 software includes 10 types of Japanese autonumbering. This feature adds automatic Japanese numbering for volumes, chapters, paragraphs, footnotes, and pages, letting users easily create and maintain numbering for headings, sections, illustrations, tables, figures, and footnotes.
Autonumber building blocks
It may appear that three Zenkaku numbering styles are identical to several of the existing paragraph numbering options available in western-language versions of FrameMaker today. But these styles are indeed different: They are fixed width, while the western text equivalents are not fixed width so will not suit the needs of users who are manipulating Japanese text.
Index sorting
For Japanese text, kana and kanji characters are sorted by "yomi-gana", which means pronunciation. The rest of the characters that are symbol characters are usually sorted by code value. The typical sorting order is symbols, numerics, Roman alphabetical, kana characters, Japanese symbol characters, and kanji characters.
FrameMaker 7.0 provides the ability to sort Japanese and western characters to automatically and simply produce indexes.
Color libraries
FrameMaker 7.0 software includes DIC Color Guide for spot colors, and Toyo™ Color Finder with more than 1,000 colors based on the most common printing inks in Japan. In addition, Tombo crop marks are available when printing for proper registration.
Index sorting
For Japanese text, kana and kanji characters are sorted by "yomi-kana", which means pronunciation. FrameMaker automatically recognizes the pronunciation of kana and sorts them correctly. For kanji, a user needs to provide pronunciation using kana in Marker dialog, so that kanji characters are sorted correctly by pronunciation.
The typical sorting order is as follows: symbols, numerics, Roman alphabetical, kana characters, Japanese symbol characters, and kanji characters.
Electronic publishing
FrameMaker 7.0 software provides powerful electronic publishing options. The Japanese version of Adobe Acrobat® 5.0 software is tightly integrated into FrameMaker 7.0 for Windows and Mac OS, allowing customers to output directly to Japanese Portable Document Format (PDF) in one step.
FrameMaker 7.0 also supports output to HTML and XML with contents written in Japanese.
FrameMaker 7.0 key features
Word processing
Layout
Graphics and color
Long documents and book building
Tables
Integration
Electronic distribution
Японските потребители, както и многонационалните бизнес потребители могат да се възползват напълно от усъвършенстваните функции за японско публикуване в софтуера Adobe® FrameMaker® 7.0. Възможността за дефиниране на „комбинирани“ шрифтове на западни и японски знаци в един и същи документ, интегрираните японски менюта и съобщения, както и правилата за композиция са само няколко функции във FrameMaker 7.0. Насочен към японските автори и работни групи, които трябва да създават документи от критично значение за бизнеса — като продуктова документация, инженерни спецификации, работни инструкции, каталози, ръководства и политики и процедури — FrameMaker е едновременно гъвкав и мощен.
Потребителите на FrameMaker, като многонационални компании, нуждаещи се от обмен на информация с техните бизнес партньори в Япония, не е необходимо да закупуват специална японска версия на FrameMaker. Потребителите могат да достъпват японските функции на FrameMaker 7.0 с познат потребителски интерфейс, стига да е инсталирана японска операционна система. Документите, създадени в тези западни среди на операционни системи, могат да бъдат директно отваряни и редактирани в японската среда и след това отпечатвани, разпространявани и превеждани.
Японски знаци
Традиционно японският се пише вертикално, започвайки от горния десен ъгъл. Японският също може да се пише хоризонтално и отляво надясно. Нарастващ брой публикации следват западния стил отляво надясно, отгоре надолу. Това е особено вярно за професионалните публикации.
Японски знакови системи
Японското писмо е смес от три различни системи, наречени kanji, hiragana и katakana. Hiragana и katakana са известни заедно като „kana“.
Kanji, възприети от китайския, се състоят от основните идеограми или знаци, всеки представляващ една дума. Към днешна дата има повече от 8000 знака kanji, които съставляват повече от 300 000 думи.
Знаците Hiragana се използват за думи от японски произход. Знаците hiragana често се използват за частици (като to, at и други предлози), които означават субект или обект, и за окончания или думи, изписани в kanji.
Katakana, по-ъглов знаков набор, дублира същия набор от звуци, които съществуват за hiragana, но katakana често се използва за писане на английски и други чуждестранни думи и имена — подобно на стенографска система.
Въвеждане на японски текст
Front-end процесор
Най-широко използваният метод за въвеждане на японски знаци е чрез вграден или софтуер от трети страни, който позволява текстът да бъде въведен, като думата се изписва фонетично на клавиатурата (обикновено използвайки римски букви). Потребителят след това търси чрез софтуера правилния kanji знак, тъй като много знаци имат едно и също произношение.
Този входен софтуер се нарича front-end процесор (FEP) или понякога input method editor (IME).
Японски двубайтови знакови набори
Тъй като има толкова много японски знаци, е невъзможно всички те да бъдат представени с единичен 7-битов или 8-битов тип данни. Японският индустриален стандартен (JIS) комитет (японският еквивалент на ANSI) е установил стандартен знаков набор, известен като JIS X208, който определя знаците, които ще бъдат дефинирани, и кода, който ще бъде присвоен на знаците. Съществуват най-малко три отделни кодирания за JIS X208:
JIS Работи в 7-битова среда и поддържа еднобайтов ASCII, както и двубайтови японски знаци, използвайки специални знакови последователности, които започват със знака „escape“ (ESC).
Shift-JIS Работи в 8-битова среда и е нативното японско кодиране на платформите Windows® и Mac OS.
EUC (Extended Unix Code) Работи в 8-битова среда и се използва широко на UNIX® платформи.
Shift-JIS срещу Unicode
Unicode е фиксирана ширина, 16-битов знаков набор, който покрива повечето писмени езици в света, които се използват в момента или се очаква да бъдат използвани в компютрите. Тъй като типовите семейства обикновено са проектирани и ограничени до определена писмена система, софтуерна програма все още се нуждае от информация за типово семейство, език и форматиране. FrameMaker 7.0 използва Shift-JIS като своя вътрешна система за кодиране на японски, така че потребителите да могат да се възползват от големи и нарастващи шрифтови набори, както и от инструментите, които разширяват и манипулират шрифтовете.
Използване на FrameMaker 7.0 за японско публикуване
FrameMaker 7.0 включва възможността за създаване на документи на японски език — всичко, от което се нуждаете, е японска операционна система за въвеждане и показване на японски текст. В средата на Mac OS потребителите могат да добавят японски възможности към западна операционна система.
Поддръжка на японски знаци и шрифтове
Софтуерът FrameMaker 7.0 поддържа най-популярните японски текстови кодирания (JIS, Shift-JIS и EUC), така че потребителите на работни групи могат да обменят текстови файлове на различни платформи с различни формати. FrameMaker също поддържа Enhanced Type 1 шрифтове, както и TrueType шрифтове на платформите Windows и Mac OS.
Вграден вход
FrameMaker 7.0 поддържа вграден или „on-the-spot“ вход, който позволява на потребителите директно да въвеждат японски знаци в WYSIWYG среда, вместо да създават текст в отделен прозорец и да го поставят на страницата. Потребителите могат да използват всеки съвместим FEP или IME по техен избор.
Rubi
Rubi знаците са много малки знаци, които се появяват над други знаци. Rubi знаците анотират знаците, като посочват тяхното произношение или като допълват техните значения. FrameMaker 7.0 предоставя прецизен типографски контрол на rubi знаците и поддържа вграден вход, което много малко приложения предлагат.
Комбинирани шрифтове
Обичайно е в техническата документация да се смесват японски и западни знаци в един и същи японски документ. Например западните знаци се използват за имена на продукти, числа и имена на хора.
Софтуерът FrameMaker 7.0 позволява на потребителите да създават персонализирани „комбинирани“ шрифтове. Когато се използва комбиниран шрифт, западните знаци се показват с помощта на западните шрифтове, а японските знаци се показват с помощта на японските шрифтове. Това позволява на потребителите да включват както японски, така и западни шрифтове в ред от текст, запазвайки последователен външен вид, както и правилните пропорции за двата шрифта.
Пренасяне на редове и сричкопренасяне (правила за композиция)
FrameMaker 7.0 отговаря на японските издателски стандарти, като поддържа правилата Kumihan (японска композиция) за пренасяне на редове и сричкопренасяне на текст. FrameMaker също позволява фина персонализация на тези правила, за да отговарят на корпоративните типографски стандарти.
Променливи
FrameMaker 7.0 поддържа както японски, така и западни специфични за държавата нотации за дати, включително използването на нативни японски императорски и kanji дати и страници в документи.
Автономериране
Софтуерът FrameMaker 7.0 включва 10 вида японско автономериране. Тази функция добавя автоматично японско номериране за томове, глави, параграфи, бележки под линия и страници, позволявайки на потребителите лесно да създават и поддържат номериране за заглавия, секции, илюстрации, таблици, фигури и бележки под линия.
Строителни блокове за автономериране
Може да изглежда, че три стила на номериране Zenkaku са идентични на няколко от съществуващите опции за номериране на параграфи, достъпни в западноезичните версии на FrameMaker днес. Но тези стилове наистина са различни: Те са с фиксирана ширина, докато западните текстови еквиваленти не са с фиксирана ширина, така че няма да отговарят на нуждите на потребителите, които манипулират японски текст.
Сортиране на индекси
За японски текст, kana и kanji знаците се сортират по „yomi-gana“, което означава произношение. Останалите знаци, които са символни знаци, обикновено се сортират по кодова стойност. Типичният ред на сортиране е: символи, числа, римска азбука, kana знаци, японски символни знаци и kanji знаци.
FrameMaker 7.0 предоставя възможността за сортиране на японски и западни знаци, за да произвежда автоматично и просто индекси.
Цветови библиотеки
Софтуерът FrameMaker 7.0 включва DIC Color Guide за спот цветове и Toyo™ Color Finder с повече от 1000 цвята, базирани на най-разпространените печатни мастила в Япония. Освен това Tombo crop marks са налични при печат за правилна регистрация.
Сортиране на индекси
За японски текст, kana и kanji знаците се сортират по „yomi-kana“, което означава произношение. FrameMaker автоматично разпознава произношението на kana и ги сортира правилно. За kanji, потребителят трябва да предостави произношение, използвайки kana в диалога на маркера, така че kanji знаците да бъдат сортирани правилно по произношение.
Типичният ред на сортиране е следният: символи, числа, римска азбука, kana знаци, японски символни знаци и kanji знаци.
Електронно публикуване
Софтуерът FrameMaker 7.0 предоставя мощни опции за електронно публикуване. Японската версия на софтуера Adobe Acrobat® 5.0 е плътно интегрирана във FrameMaker 7.0 за Windows и Mac OS, което позволява на клиентите да извеждат директно към японски Portable Document Format (PDF) в една стъпка.
FrameMaker 7.0 също поддържа извеждане към HTML и XML със съдържание, написано на японски.
Ключови функции на FrameMaker 7.0
Текстообработка
Оформление
Графика и цвят
Дълги документи и създаване на книги
Таблици
Интеграция
Електронно разпространение
Combined fonts assign two component fonts to one combined font name. Combined fonts are special fonts created in FrameMaker that use Asian fonts for the Asian characters combined with regular fonts for the Latin characters. This is done to handle both an Asian font and a Western font as though they are in one font family. In a combined font, the Asian font is the base font and the Roman font is the Western font.
If an Asian-language document with combined fonts is opened on a system that uses a different Asian language or a Western language, the Western component font is used for all text with the combined font. Text that used the Asian component font will be unreadable. If the document is then saved and reopened on a system with its original language, the Western text will appear correctly, but the information about the original Asian text will be lost.
If you intend to move your documents across different Asian languages,do not use Asian characters for paragraph and character tag and combined font names. If you do, unexpected loss of data may occur.
When you create a new document, two combined fonts are predefined in the new document. The names of the combined fonts are FMMyungjo and FMGothic for Korean, FMSongTi and FMHeiTi for Simplified Chinese, and FMSungTi and FMHeiTi for Traditional Chinese. The most commonly used Roman and Asian fonts are assigned as the component fonts for each combined font.
To create a combined font, go to Format > Document > Combined Fonts...
NOTE: If the source document uses combined fonts, do not insert cross-references with text that includes Smart Quotes. The quotation marks become meaningless characters, and FrameMaker may crash when you use Find/Change to search for a cross-reference with Smart Quotes in a combined font.
Комбинираните шрифтове присвояват два компонентни шрифта на едно комбинирано име на шрифт. Комбинираните шрифтове са специални шрифтове, създадени във FrameMaker, които използват азиатски шрифтове за азиатските знаци, комбинирани с обикновени шрифтове за латинските знаци. Това се прави, за да се борави с азиатски шрифт и западен шрифт, сякаш те са в едно шрифтово семейство. В комбиниран шрифт азиатският шрифт е основен шрифт, а римският шрифт е западният шрифт.
Ако документ на азиатски език с комбинирани шрифтове бъде отворен на система, която използва различен азиатски език или западен език, западният компонентен шрифт се използва за целия текст с комбинирания шрифт. Текстът, който използва азиатския компонентен шрифт, ще бъде нечетлив. Ако документът след това бъде запазен и отново отворен на система с оригиналния си език, западният текст ще се появи правилно, но информацията за оригиналния азиатски текст ще бъде изгубена.
Ако планирате да премествате документите си между различни азиатски езици, не използвайте азиатски знаци за тагове на параграфи и знаци и имена на комбинирани шрифтове. Ако го направите, може да възникне неочаквана загуба на данни.
Когато създавате нов документ, два комбинирани шрифта са предварително дефинирани в новия документ. Имената на комбинираните шрифтове са FMMyungjo и FMGothic за корейски, FMSongTi и FMHeiTi за опростен китайски, и FMSungTi и FMHeiTi за традиционен китайски. Най-често използваните римски и азиатски шрифтове са присвоени като компонентни шрифтове за всеки комбиниран шрифт.
За да създадете комбиниран шрифт, отидете на Format > Document > Combined Fonts...
ЗАБЕЛЕЖКА: Ако изходният документ използва комбинирани шрифтове, не вмъквайте кръстосани препратки с текст, който включва Smart Quotes. Кавичките стават безсмислени знаци и FrameMaker може да се срине, когато използвате Find/Change за търсене на кръстосана препратка със Smart Quotes в комбиниран шрифт.
 English
 Bulgarian